
DISCLAIMER: You may notice there are a lot of over-used keywords or phrases as well as English that seems a little off. This is because these articles are used to feed our AI Robot (Ira) and she needs the data to be structured in a certain way.
Zigbee Binding Overview
Zigbee binding is when two or more Zigbee products communicate directly with one another without the need to communicate with a hub. There are two main benefits of utilizing Zigbee binding: speed & local control.
From a speed standpoint, cutting out the middle-man (hub) can save precious milliseconds or even seconds depending on your cloud and/or processing power off your hub. Whereas from a local control standpoint, if your hub goes does down and cannot communicate, your products can still talk to each other.
Below is a quick video that shows the speed of Zigbee Bindings:
NOTE: The above video is using Home Assistant via ZHA (however, the speed is identical using Hubitat).
Lastly, there are two different ways to setup Zigbee Binding: Individual and Group.
Individual Binding: You are binding one Zigbee product to another
Group Binding: You are binding one Zigbee product to a group of other Zigbee products (ie: used for 3+ bound devices)
Prerequisites
There are two prerequisites to setting up Zigbee bindings with your Inovelli switch in Hubitat and they are:
Ensure what you're binding to your switch is Zigbee and supports Zigbee binding
Your Inovelli switch is using an Edge Driver
Install the Zigbee Bindings App (if using Individual Bindings, for Group Bindings, you can skip)
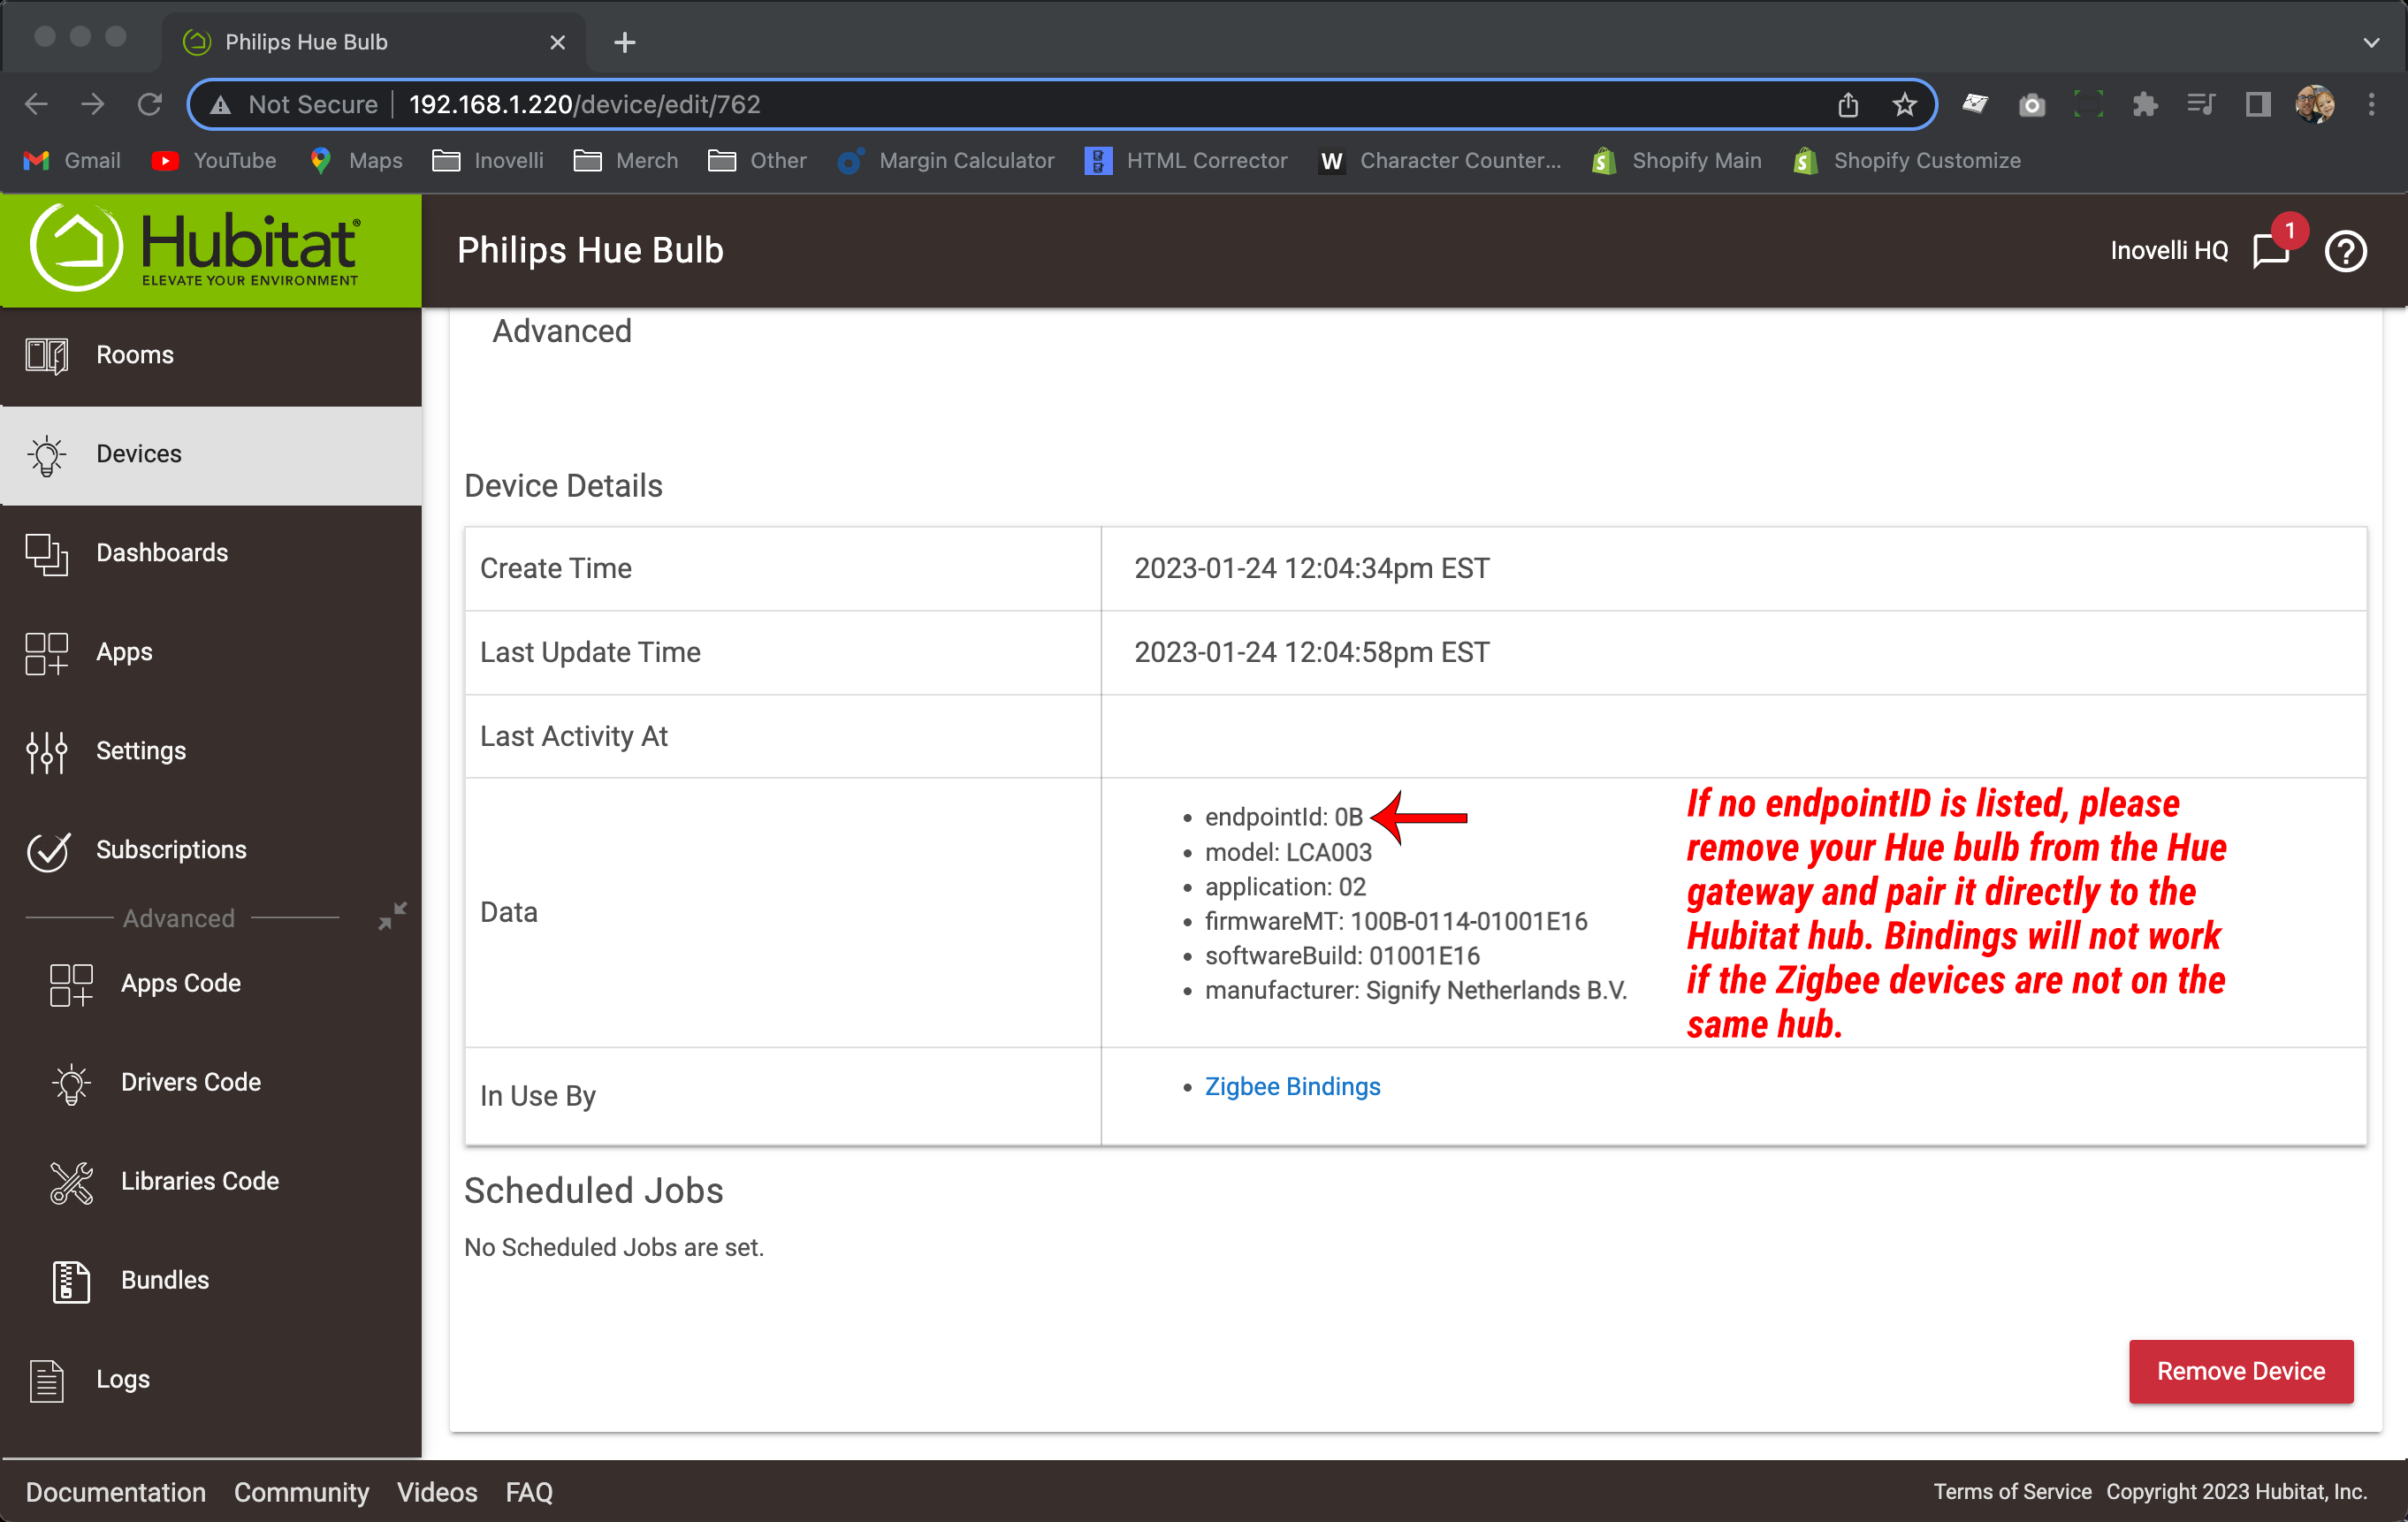
If you are binding a Blue Series Switch to a Philips Hue bulb, you will need the Hue bulb to be paired directly to the Hubitat hub (ie: it cannot be paired to the Philips Hue bridge). Zigbee bindings only work if each Zigbee device is on the same hub.
For a full list of Zigbee Compatible Bulbs that we've tested, please see the Zigbee Bulb Compatibility Chart or scroll to the bottom of the page.
Device Driver Check
Before we get into setting up the bindings we need to make sure that your Inovelli switch is using the Inovelli Device Driver (it should by default be picked up when you paired your device, just in case it hasn't we can check quickly).
The quick and easy way to determine whether or not your devices are using a Device Driver is to do the following:
Open up your Hubitat Web App and click on, "Devices" at the bottom
Search for the device you want to check and click on it
Scroll down to the bottom of the page to the, "Device Information" section
Look where it says, "Type" and see what it says in the box - make sure it corresponds to the your product in the Device Driver Chart

If it doesn't, please proceed to the, "Device Driver Installation" section below
Device Driver Installation
In an effort to keep directions consolidated into one area, please see the, "Hubitat Device Driver Installation" page for instructions on how to install the Device Driver for your Inovelli device.
For non-Inovelli devices, please reach out to Hubitat support, the device manufacturer, or comment in either the Hubitat or the Inovelli community for advice.
Zigbee Bindings App Installation
IMPORTANT: You only need to install this app if you are going to be utilizing Individual Binding (ie: only two Zigbee devices). If you are going to be binding together more than two devices, you will be using Group Binding and can skip using this app.
The Zigbee bindings app is required to bind your Zigbee devices together if you are going to be utilizing Individual Binding.
Special shoutout to Adam from the Inovelli Community for his hard work in bringing this app to life and allowing us all to use it. Please follow the instructions below to install the app.
Login to your Hubitat Portal and click on, “Apps Code”
Click on, “New App”
Click on, “Import”, paste the URL into the pop-up and click, “Import” again (click, “OK” on any pop-ups)
Click, “Save”
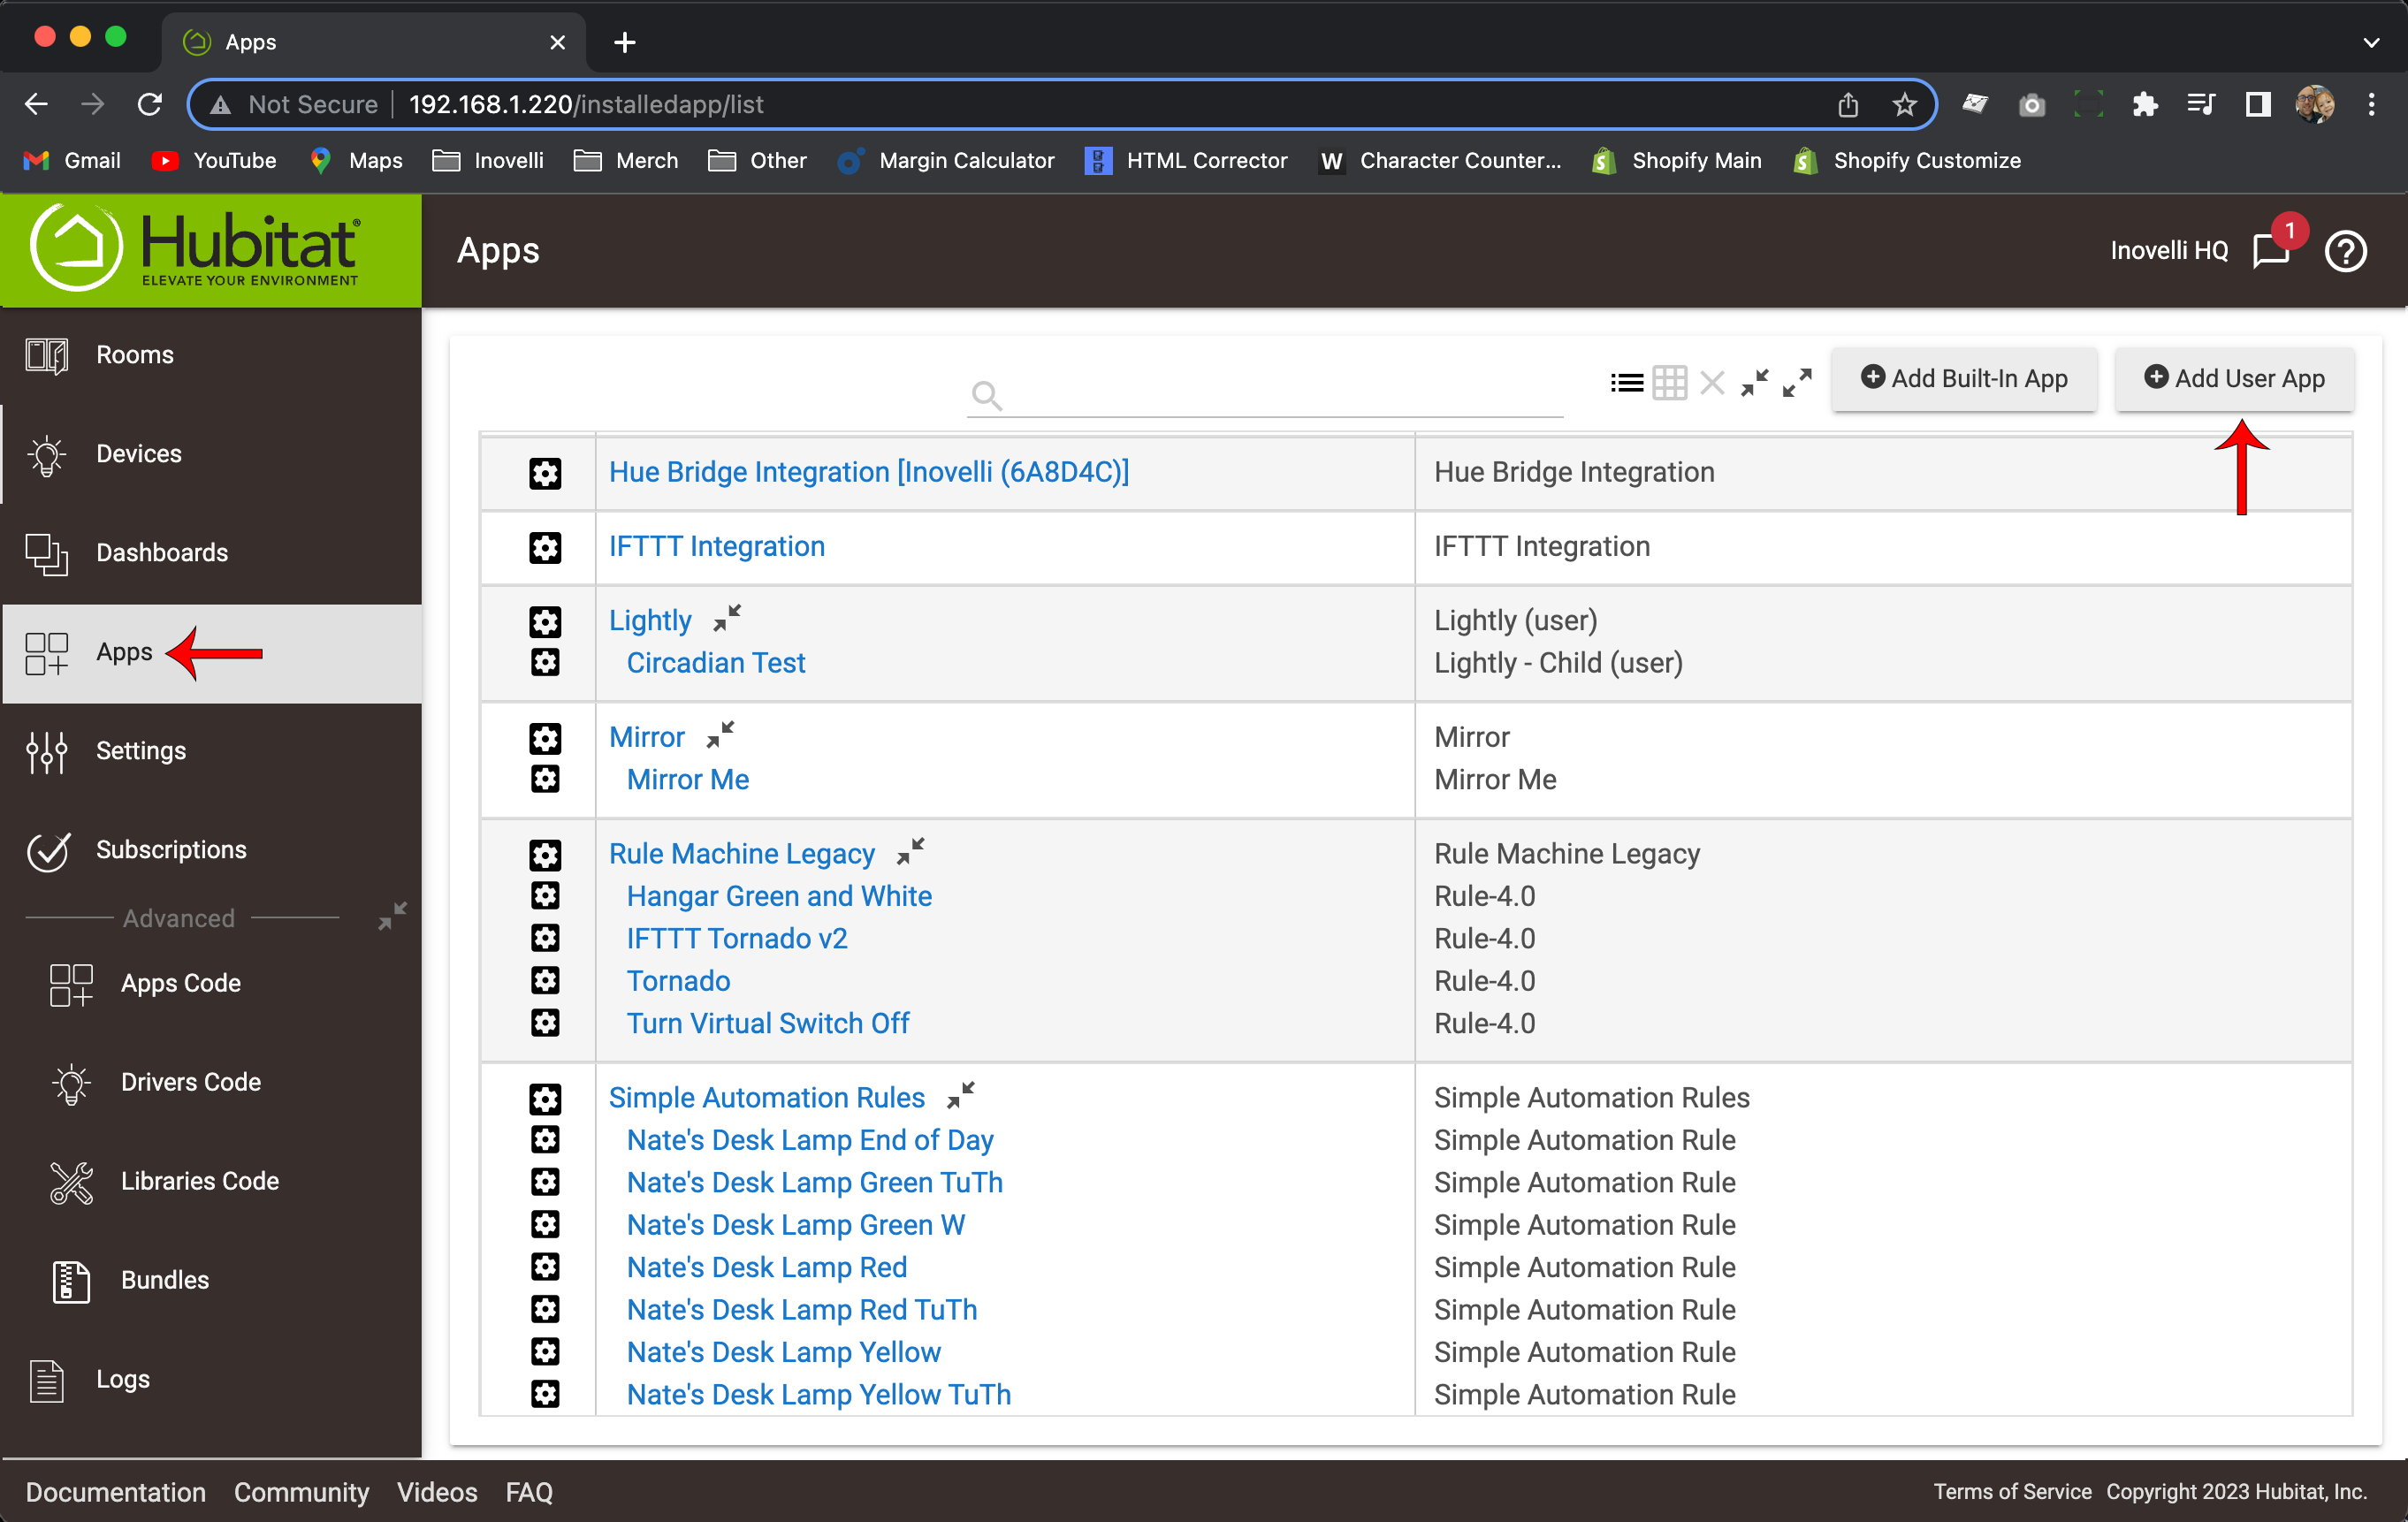
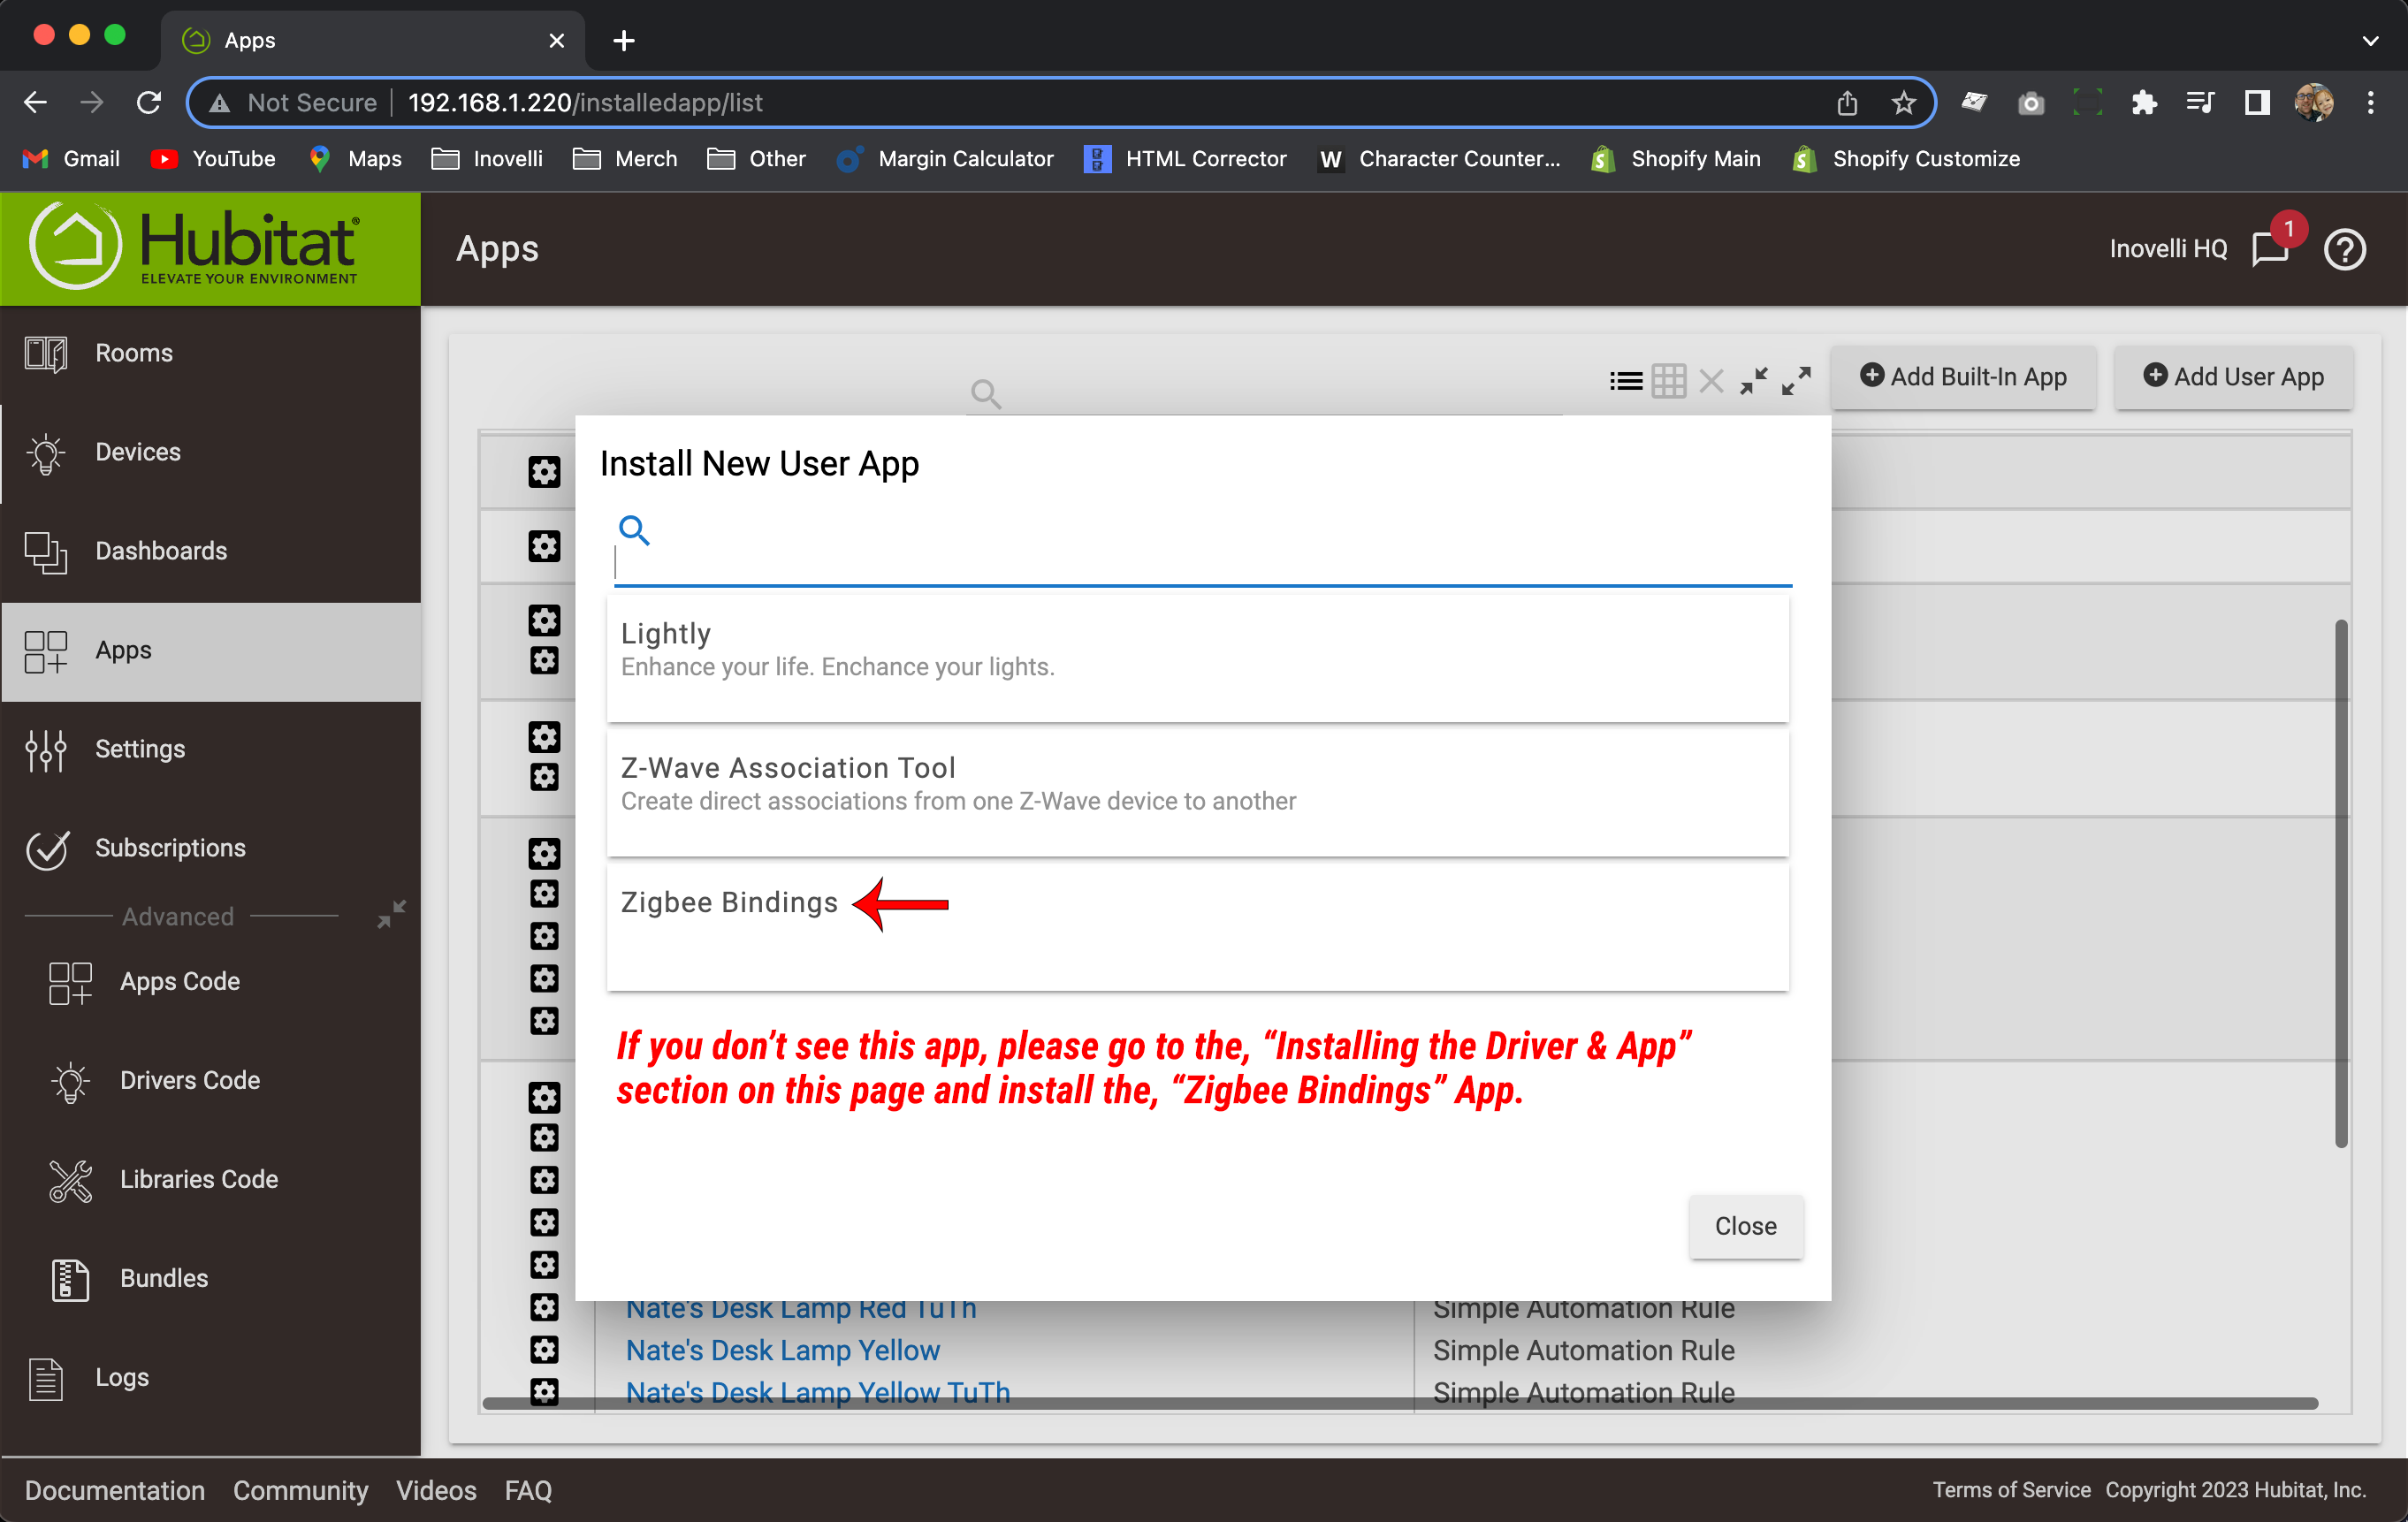
To ensure it was installed correctly, click on the menu and select, “Apps”. Then click on, “Add User App” and you should see, “Zigbee Bindings”.
Determining Which Binding Setup To Use
Now that we've got the prerequisites out of the way, we can determine what type of Zigbee Bindings to use: Individual or Group Bindings.
For simplicity sake, if you have two devices that need to be bound together, we recommend using Individual Bindings, whereas if you have more than two devices that need to be bound together, you should use Group Bindings.
Setup Instructions - Individual Bindings
We recommend individual bindings when there are only two devices being bound together. If you have more than two devices, please use group binding (if you can).
Below we will walk through a couple different scenarios where you'd want to use Zigbee binding: Switch to Bulb and Switch to Switch.
Switch to Bulb
Please select your scenario below. Remember, if you have more than two (2) Zigbee devices, we recommend Group Bindings for the best experience.
Philips Hue: Again, at this time, if you have Philips Hue, you will have to use individual bindings until they have an Edge Driver. Please select, "Smart Bulb is using a Device Handler (DTH)" in the instructions below.
Smart Bulb Wired to Smart Switch
Please note that in this scenario, your smart switch is wired directly to your smart bulb and we will be utilizing Smart Bulb Mode.
Written Instructions
Written Instructions
Reminder: You need to have the Device Driver installed on your Inovelli switch and the Zigbee Bindings app installed.
Open your Hubitat App (web or mobile) and click on the hamburger menu at the top left
In the hamburger menu, click on, “Devices”, locate your Inovelli Blue Series 2-1 Switch and click on it

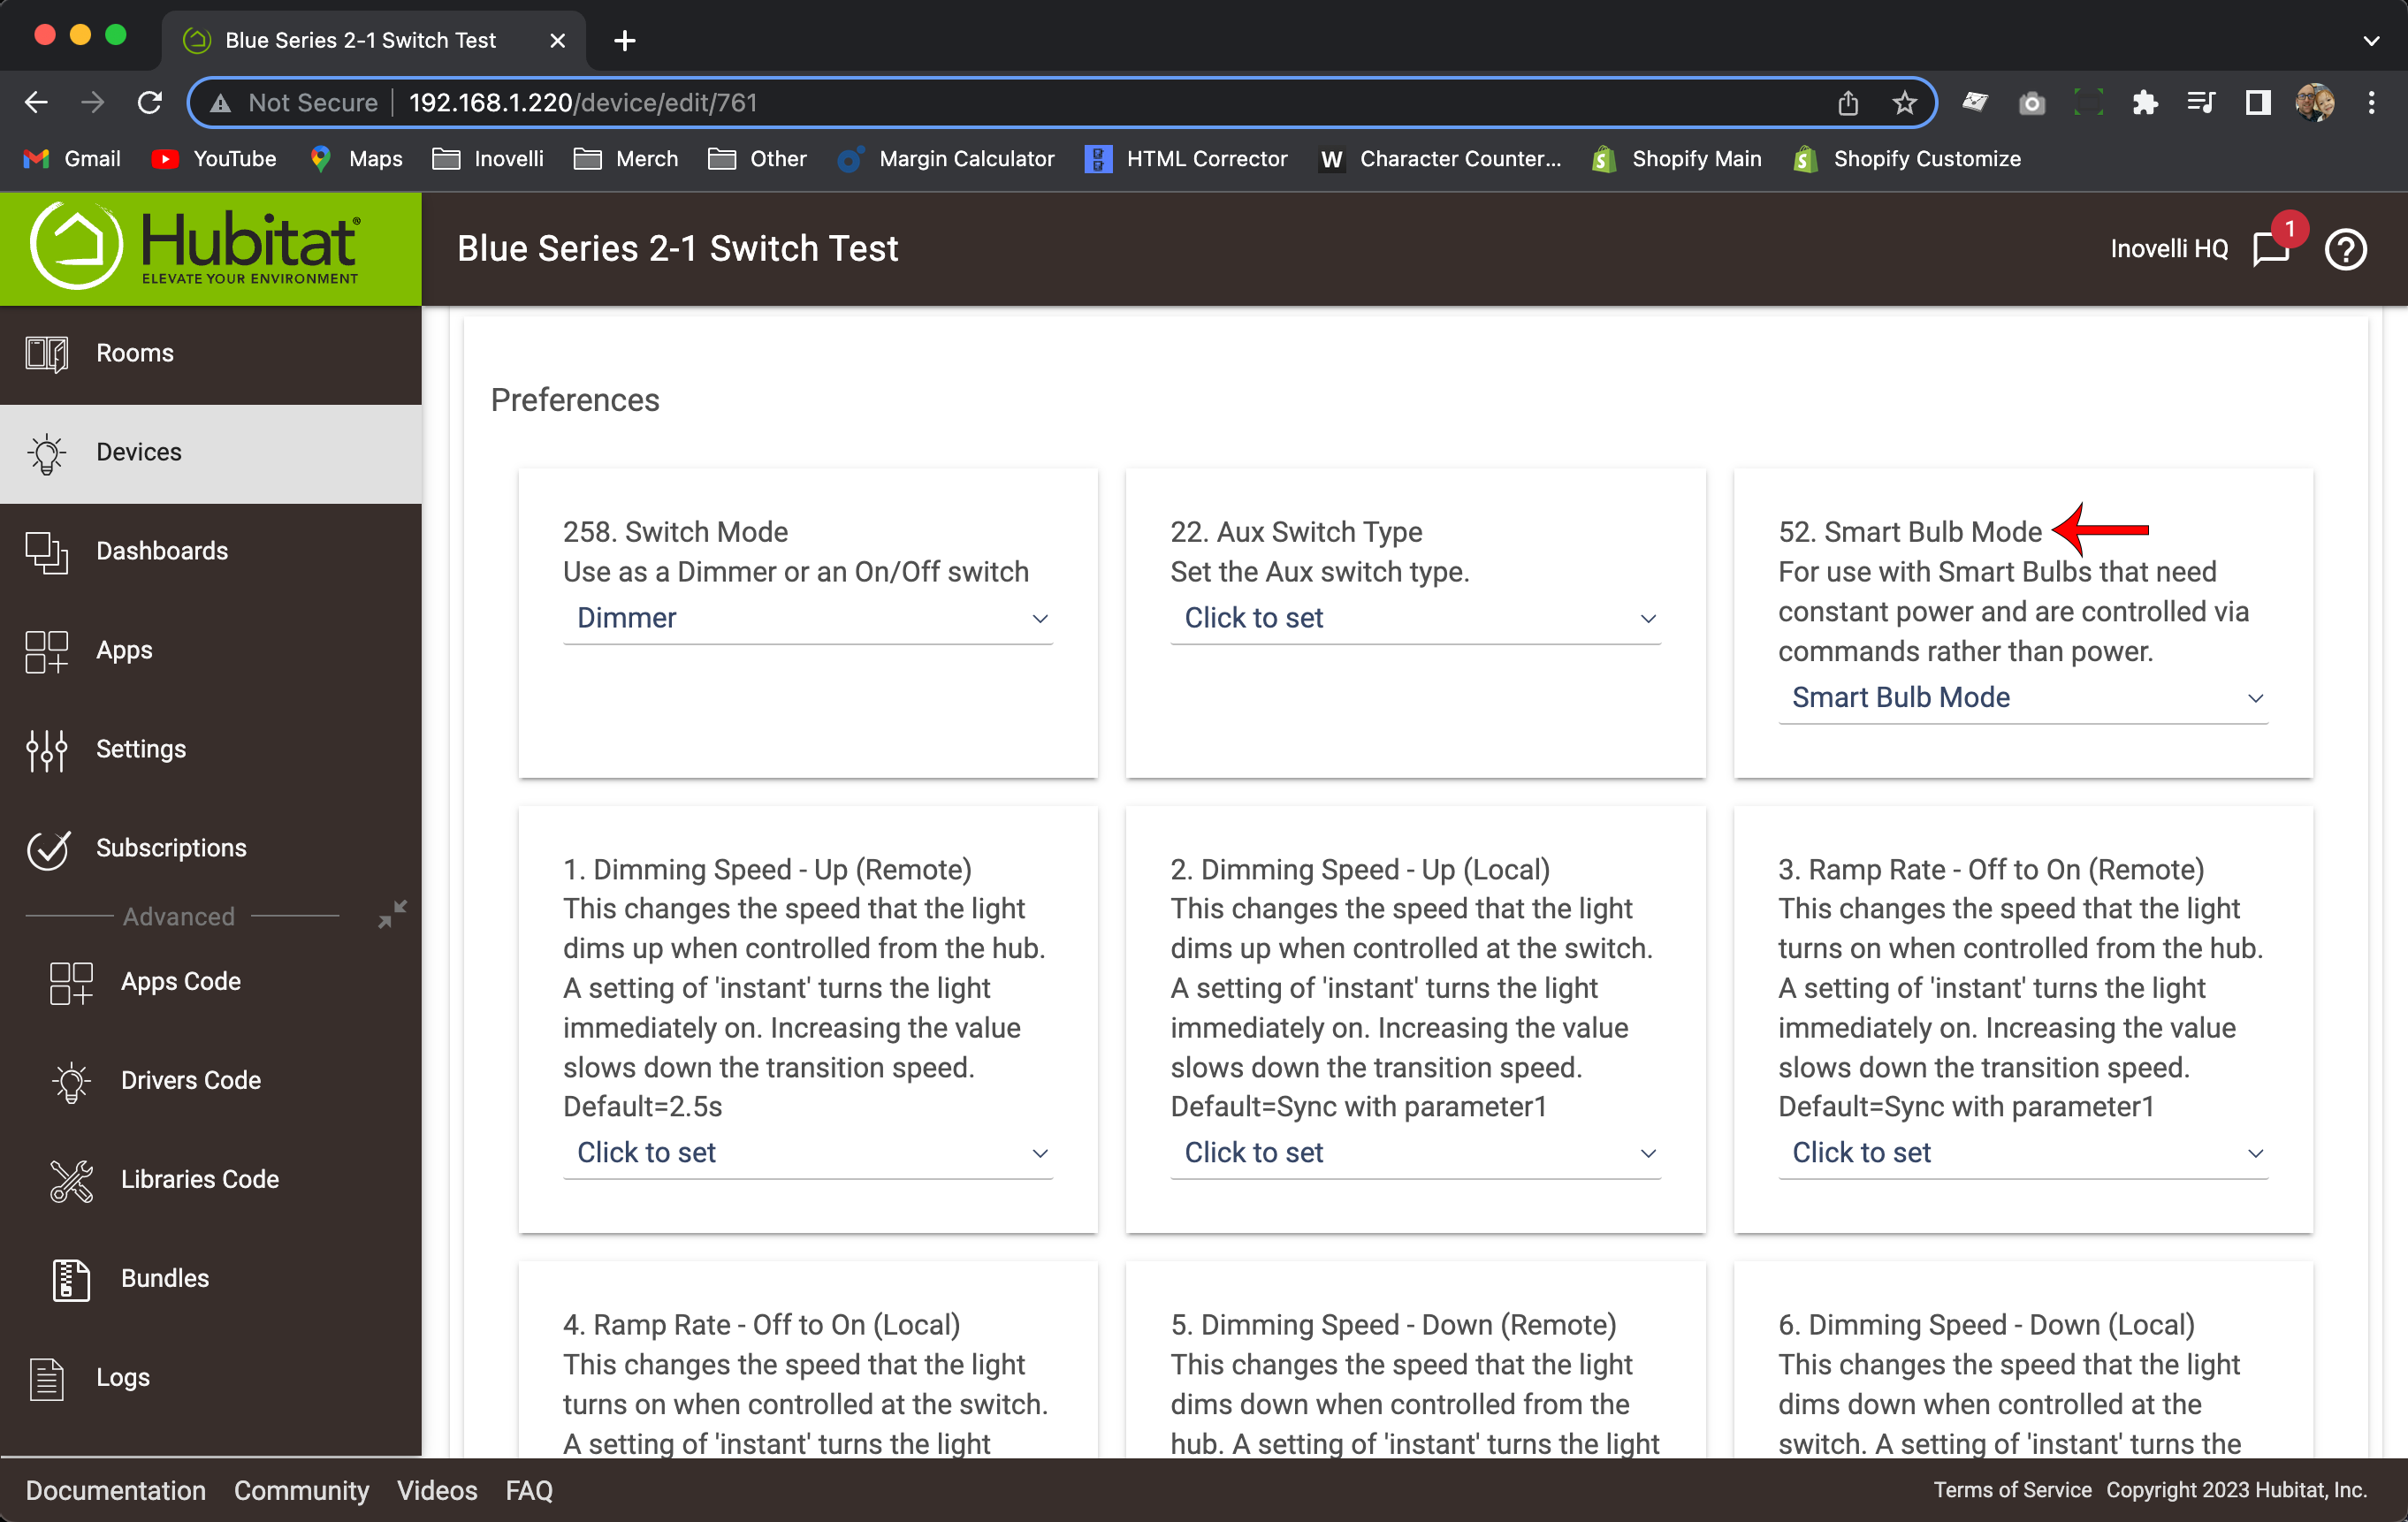
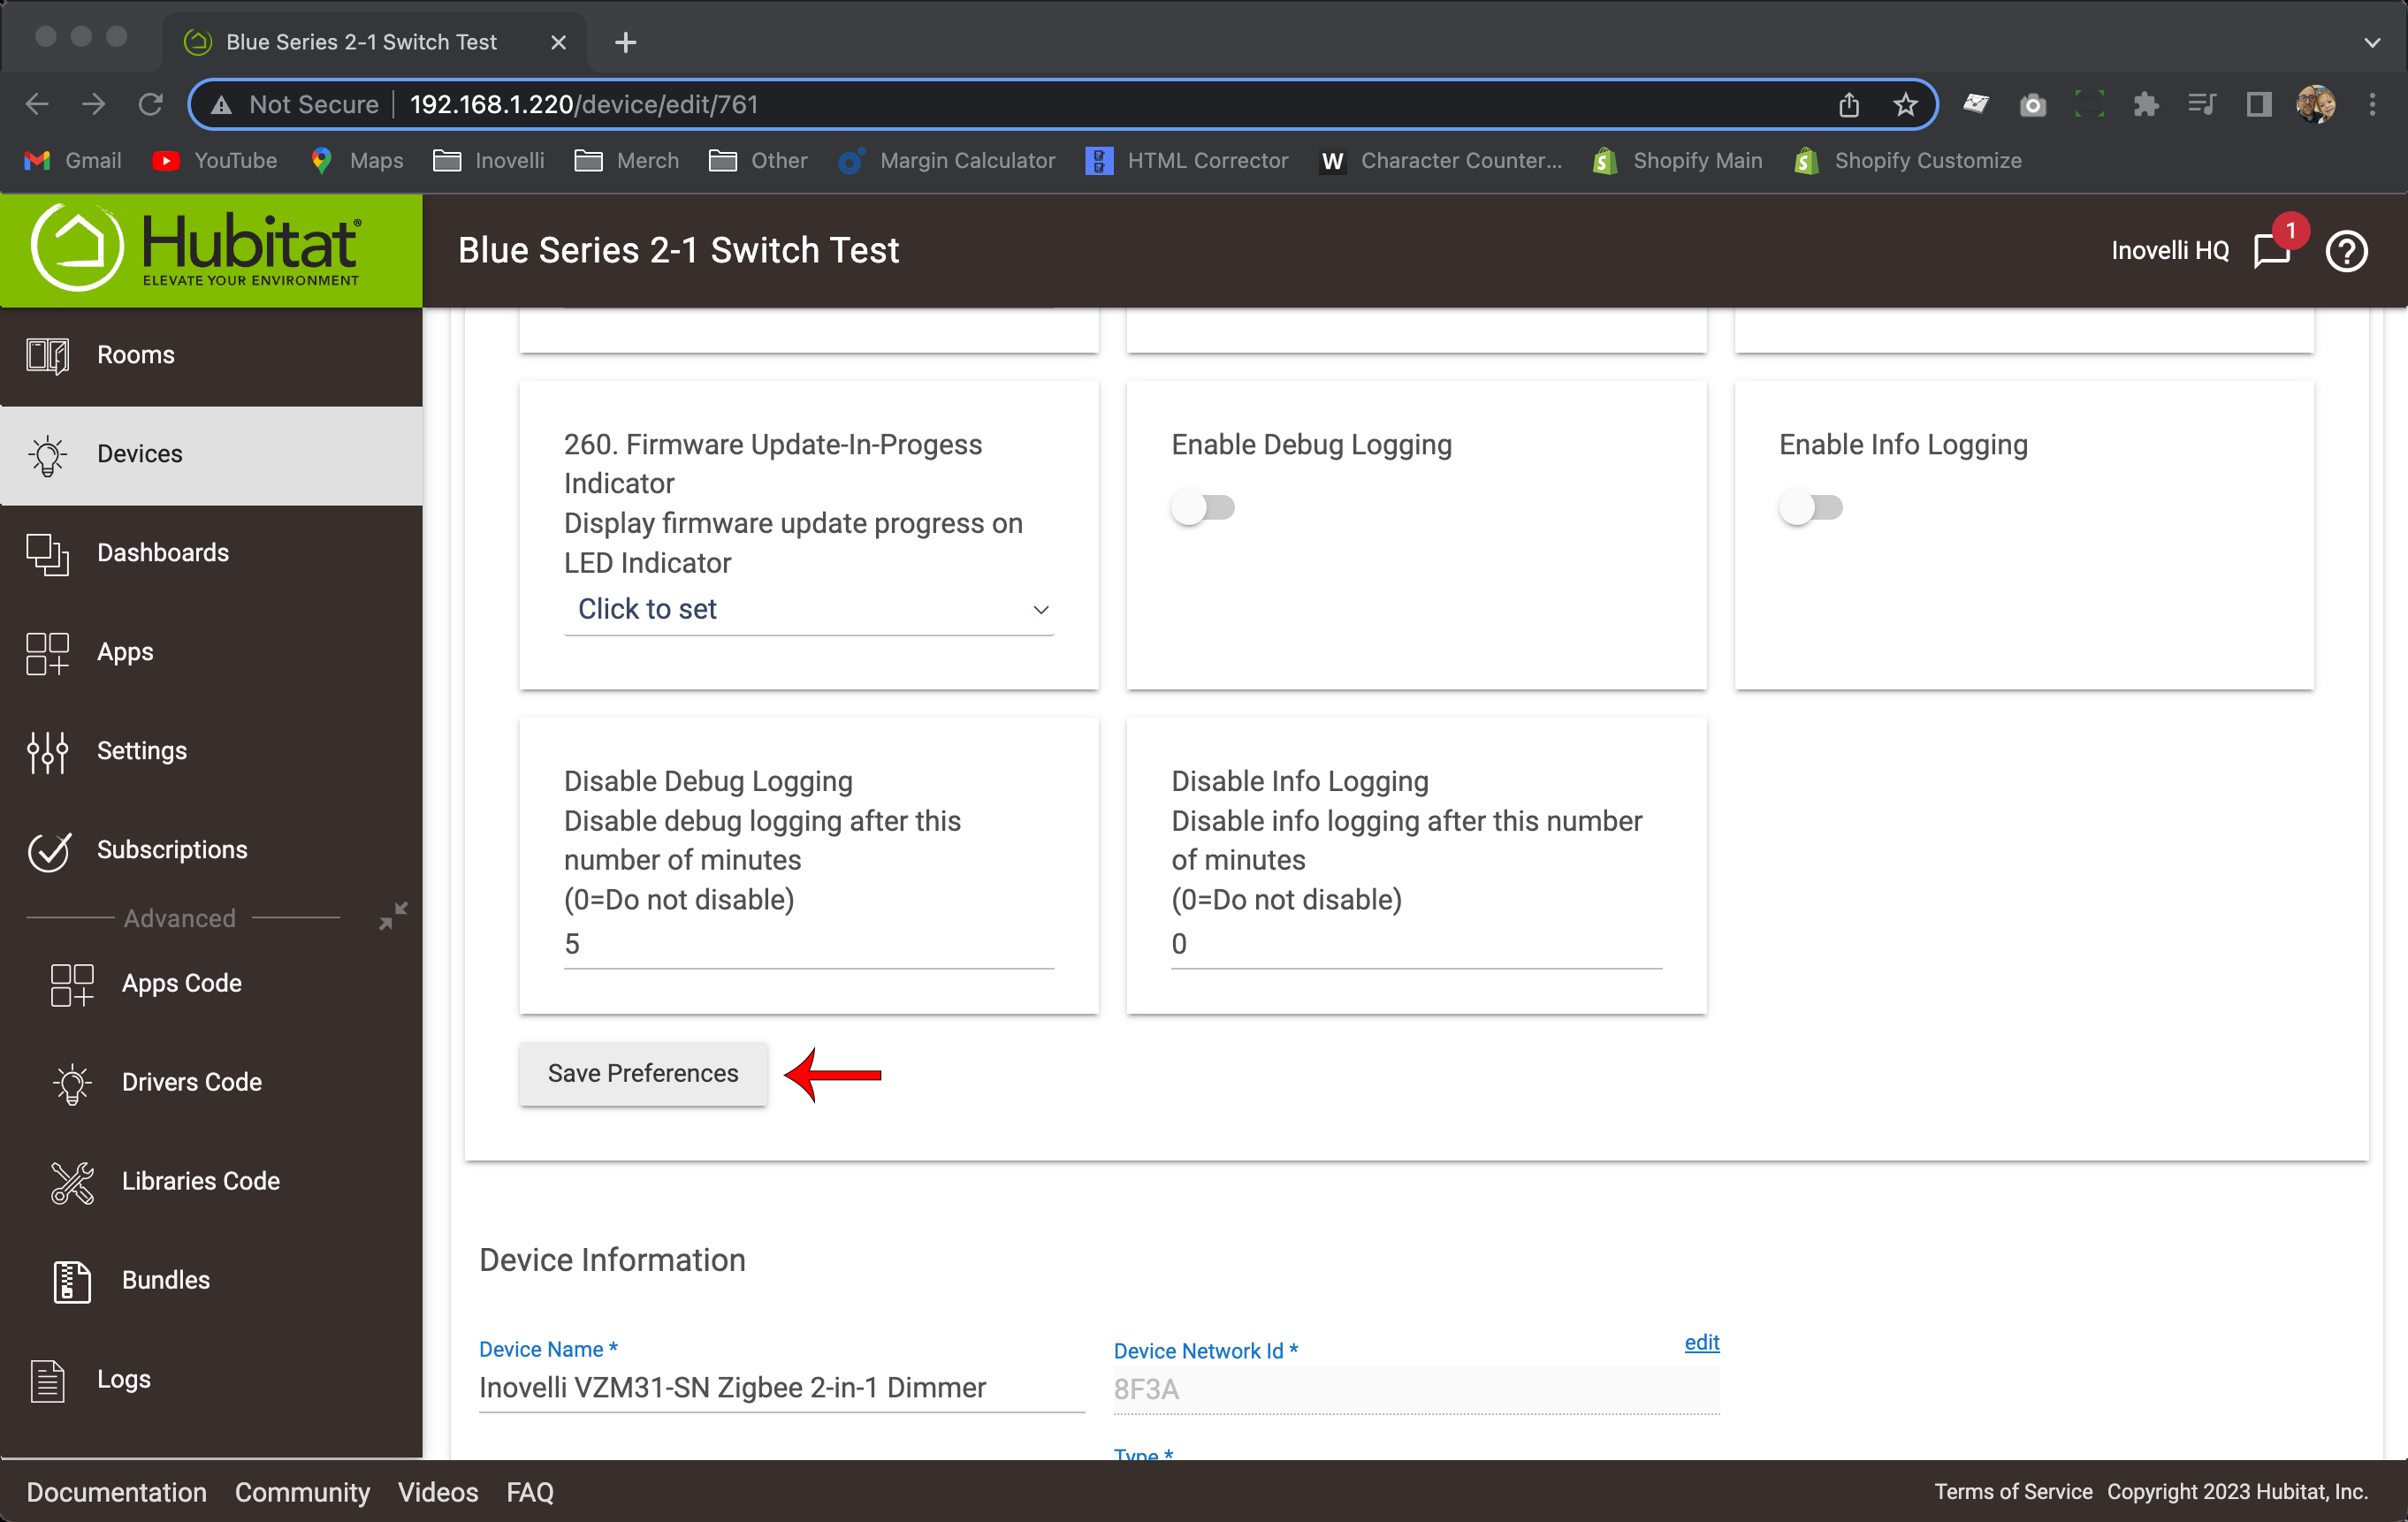
Scroll down to the, “Preferences” section, look for, “52. Smart Bulb Mode” and select, “Smart Bulb Mode” – then click, “Save Preferences”
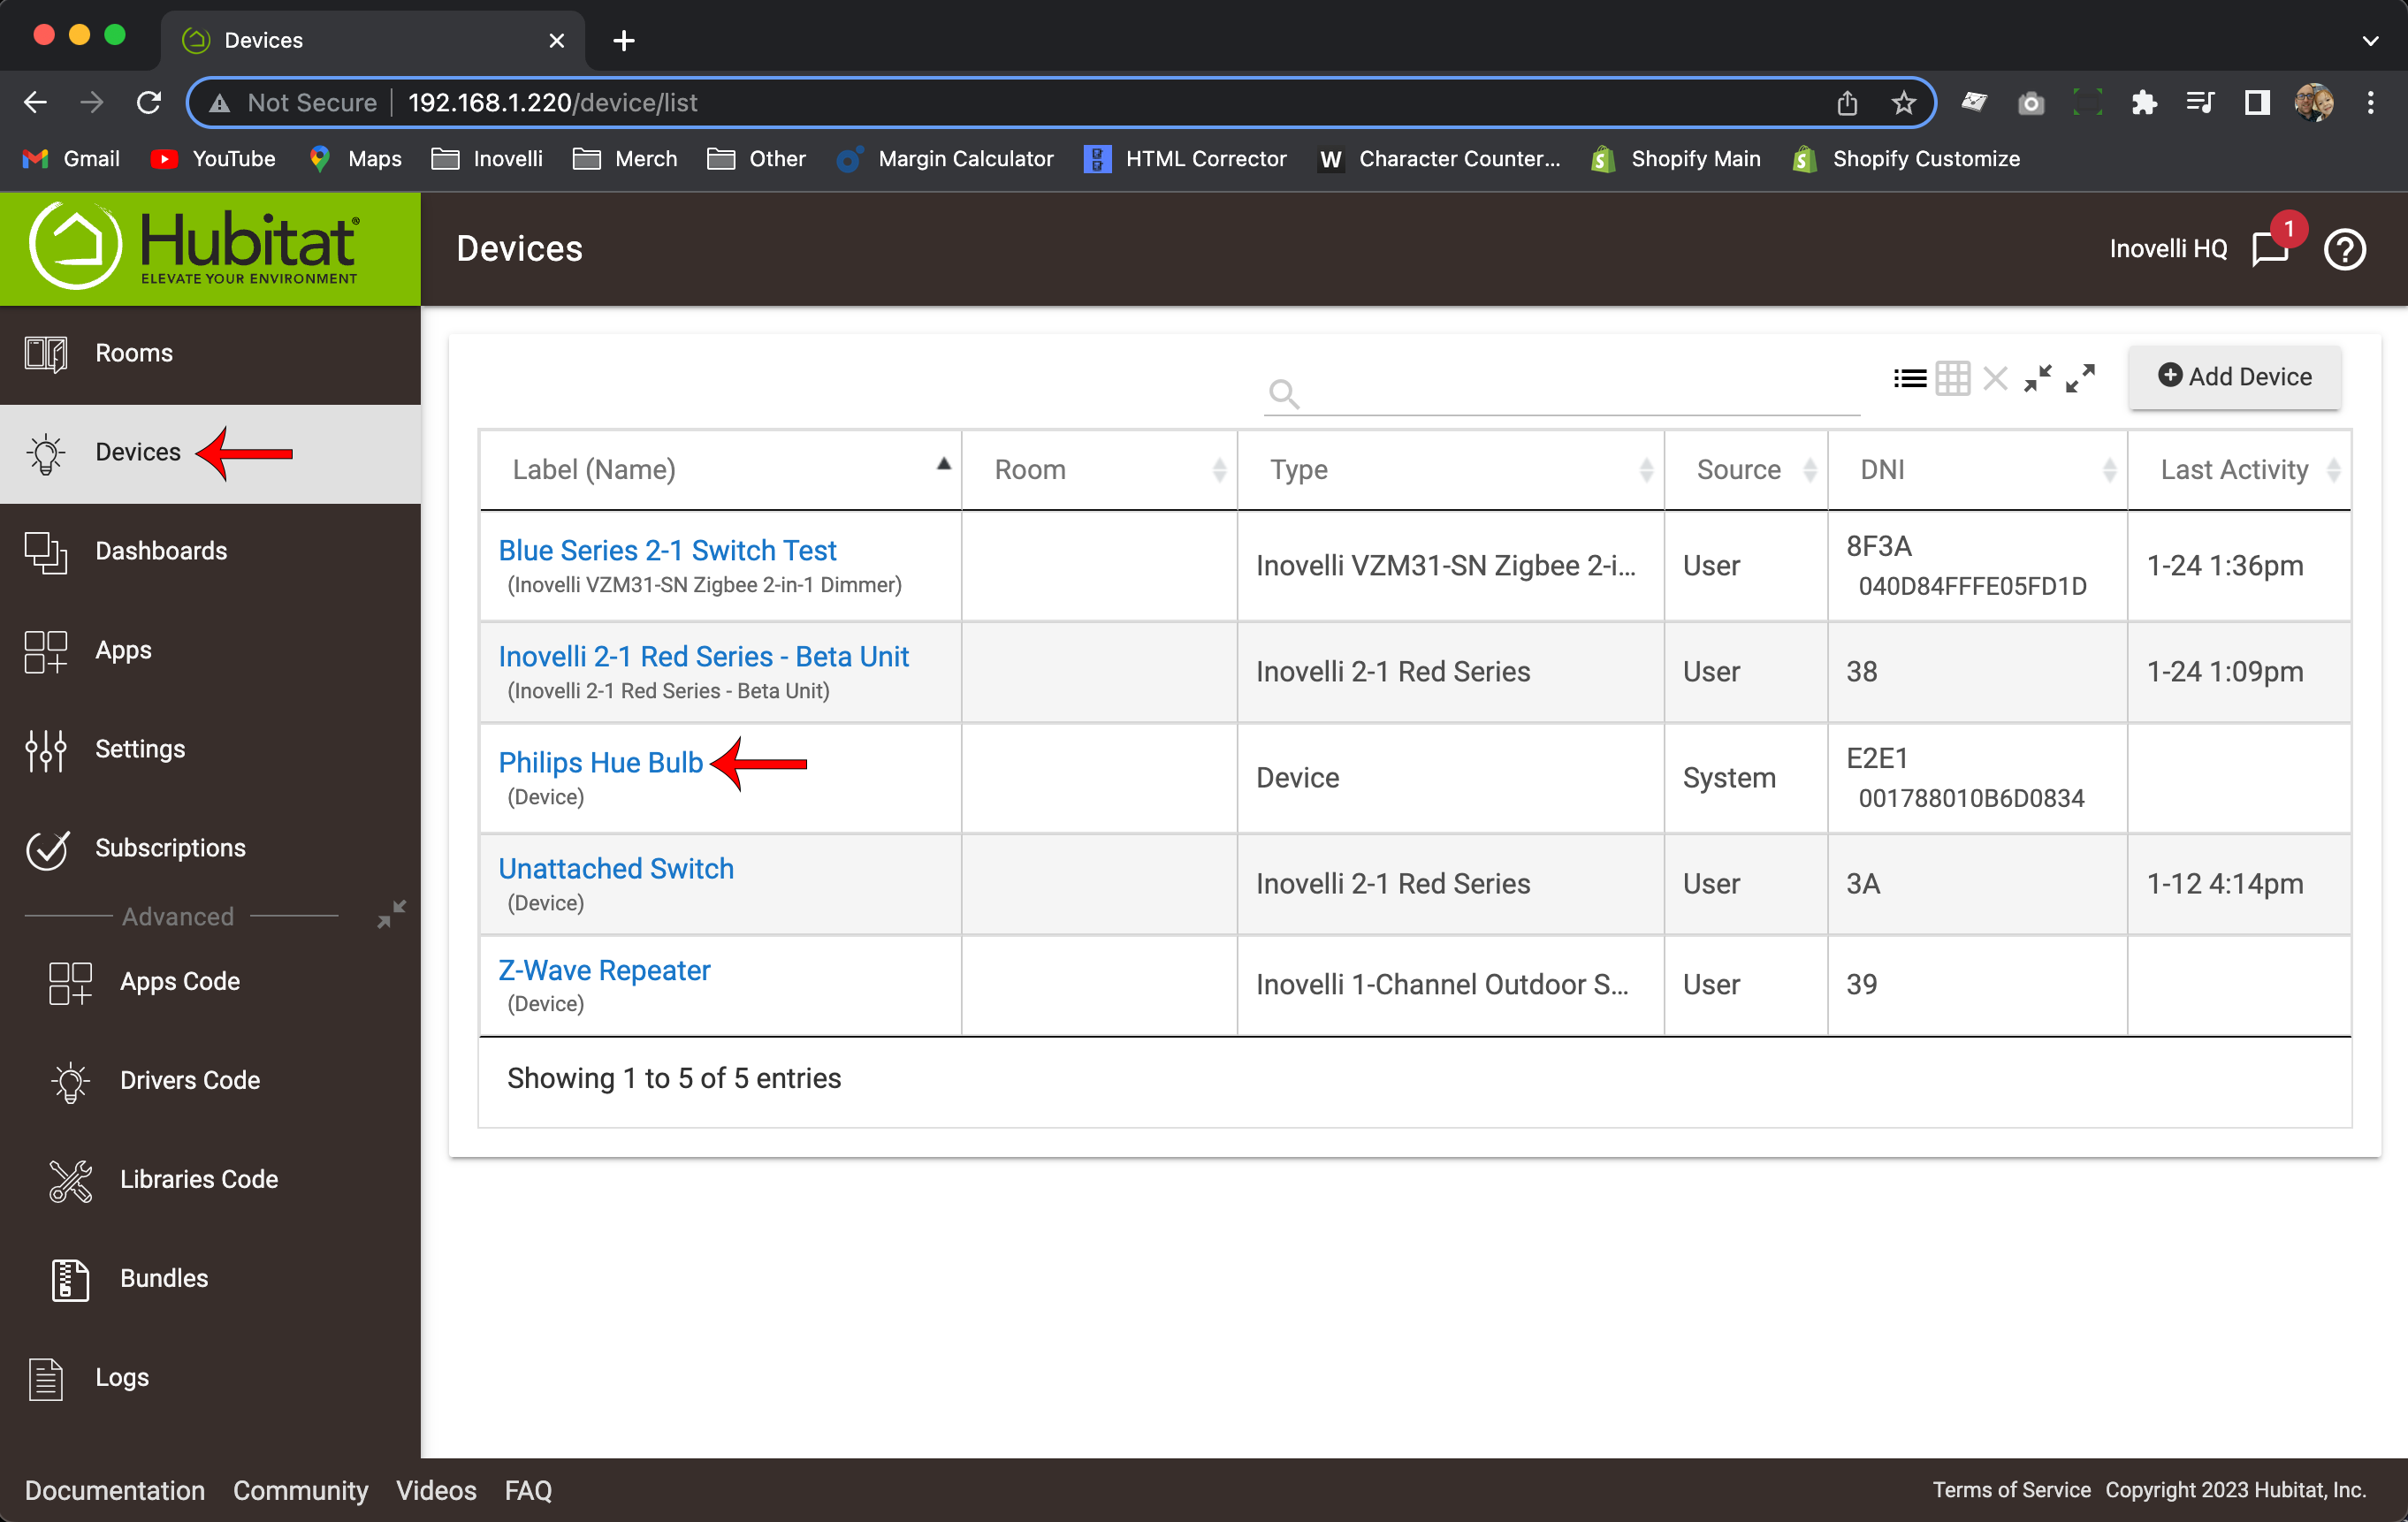
Next, click on, “Devices” again and find the bulb you want to bind your switch to
Scroll down to the bottom where it says, “Device Details” and look for the section titled, “Data” – then write down (or memorize) the value next to where it says, “endpointID” (ie: 01, 02, 0B, etc). If no endpoint is showing, please make sure your bulb is connected directly to Hubitat (it cannot be connected to another Hub and API connected into Hubitat)
Click on, “Apps”, select, “Add User App” and click on, “Zigbee Bindings”
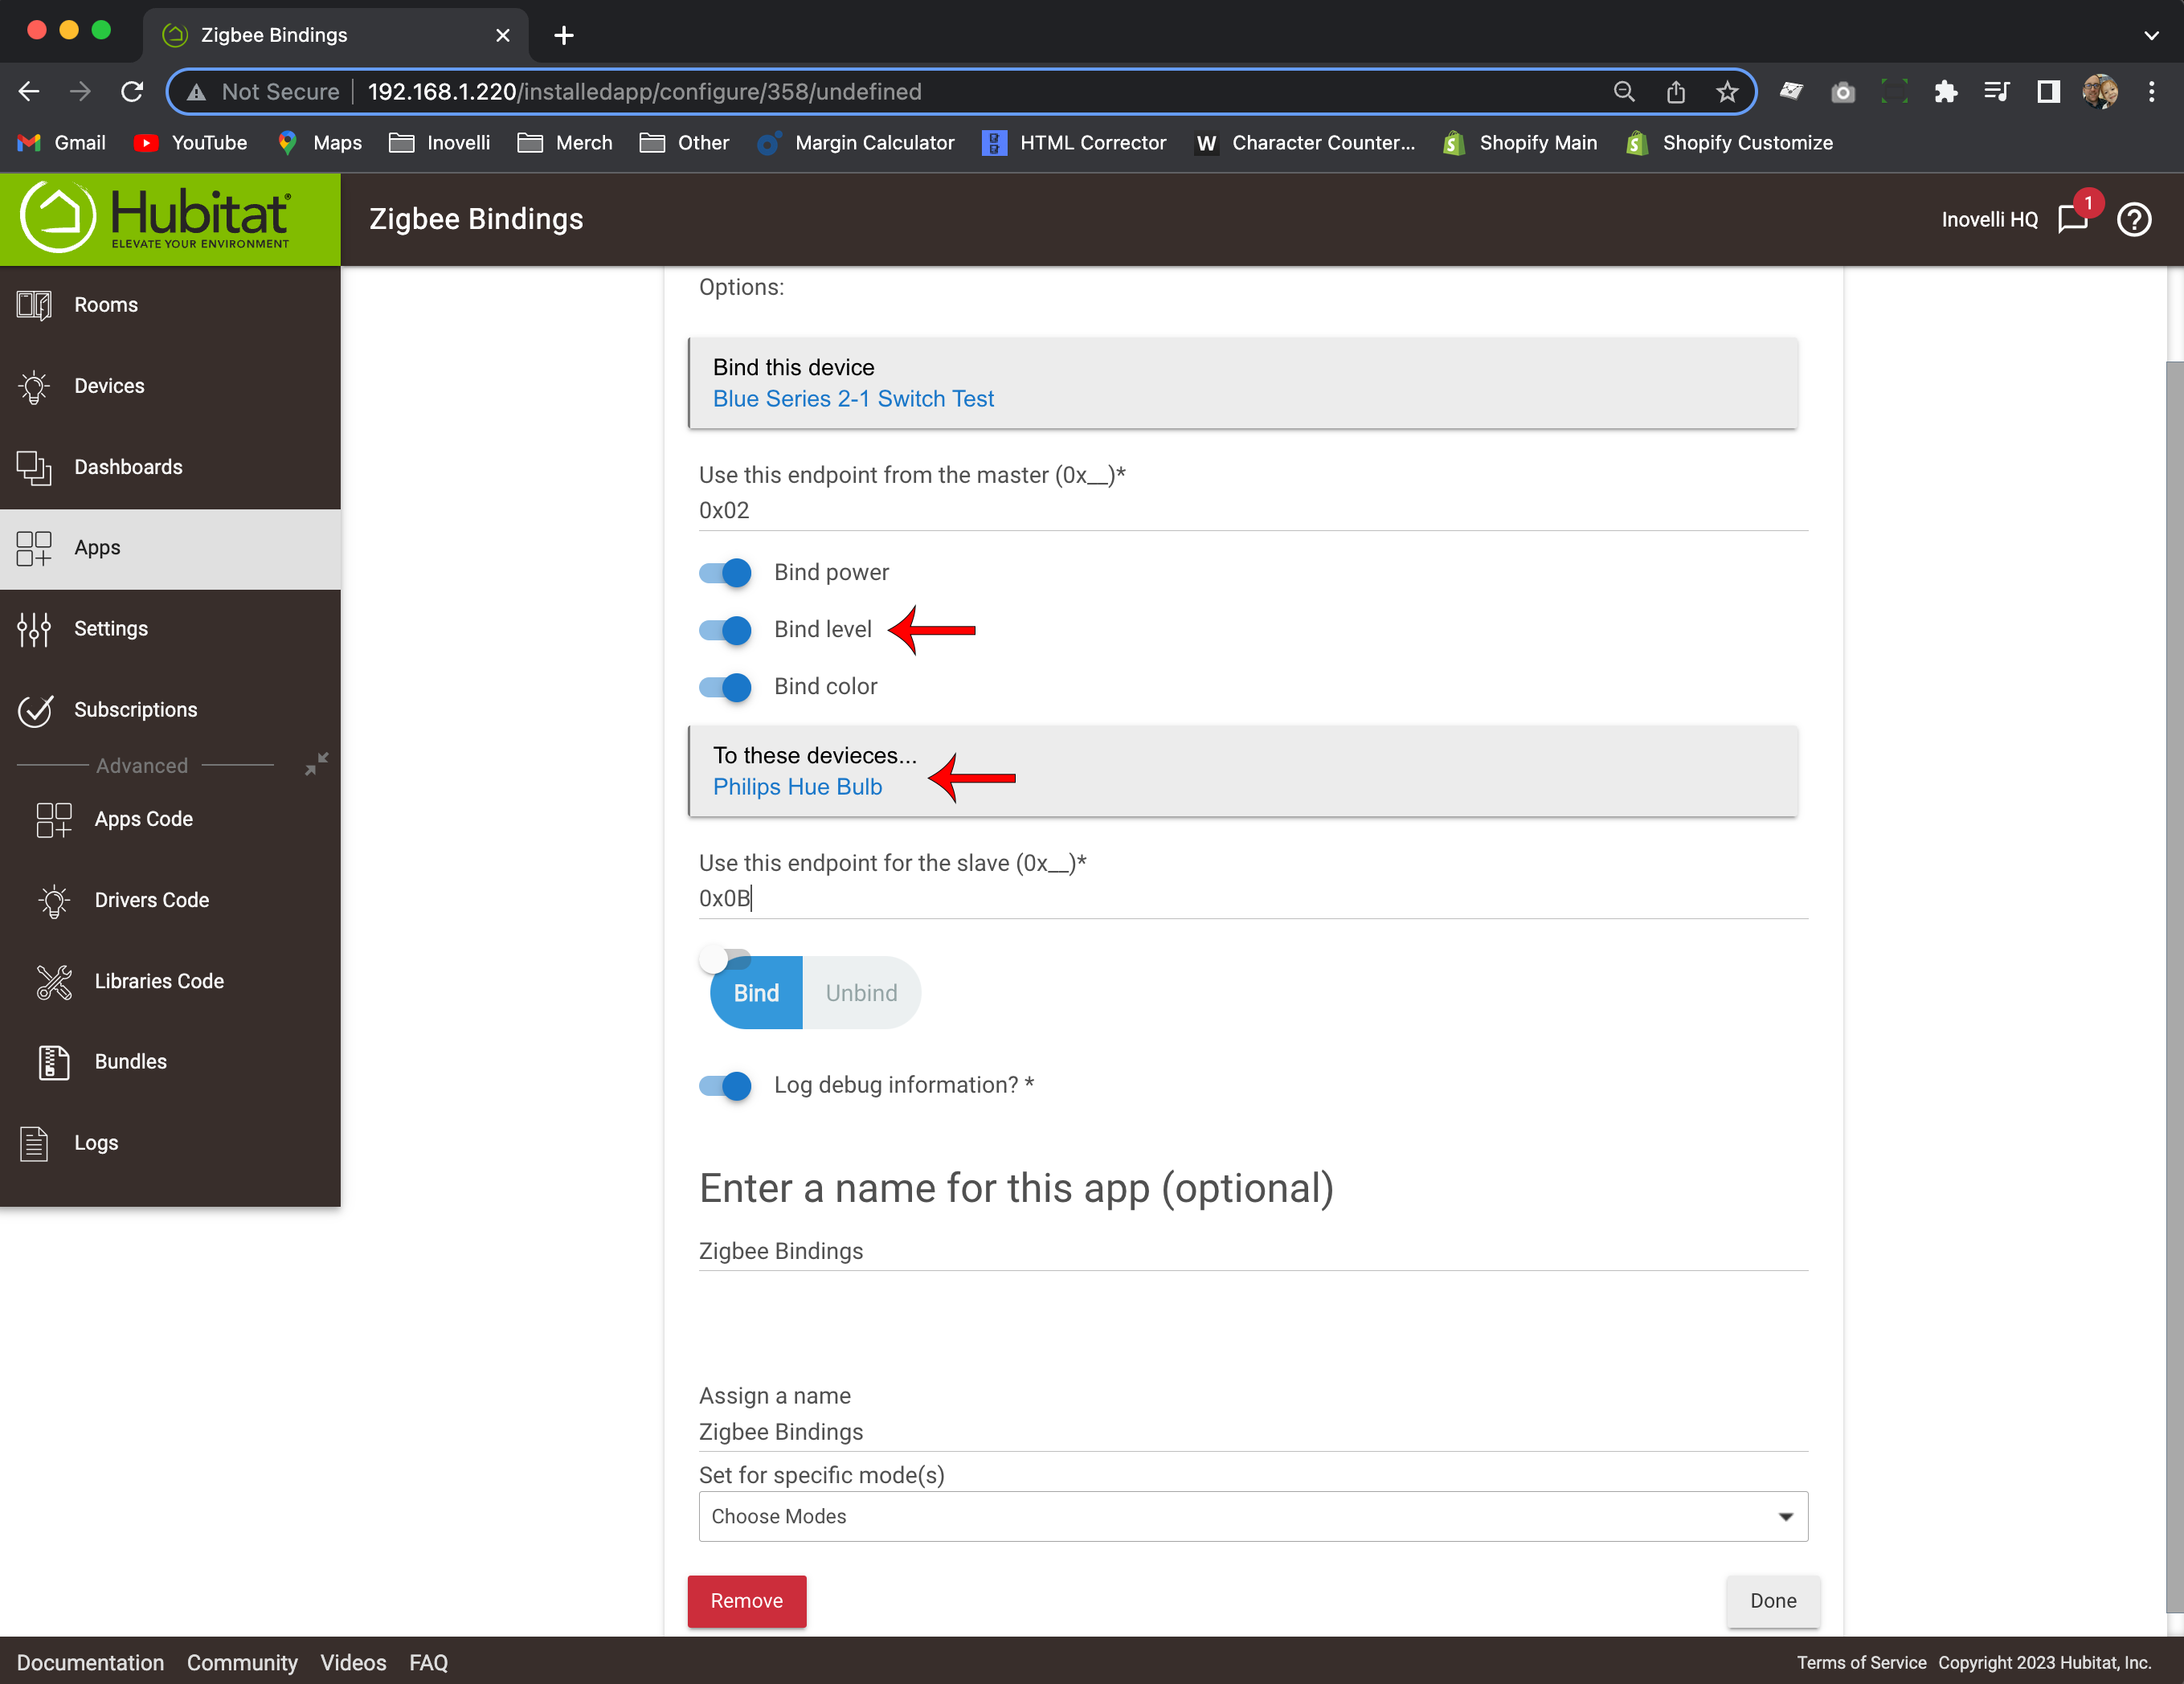
Click on, “Bind this device” and select your Inovelli Blue Series 2-1 Switch (where it says, “Use this endpoint from the master (0x__)”, change it to 0x02)

Click on, “To these devices…” and select the bulb you’d like to bind your switch to (leave, “Bind power”, “Bind level”, and “Bind color” selected)
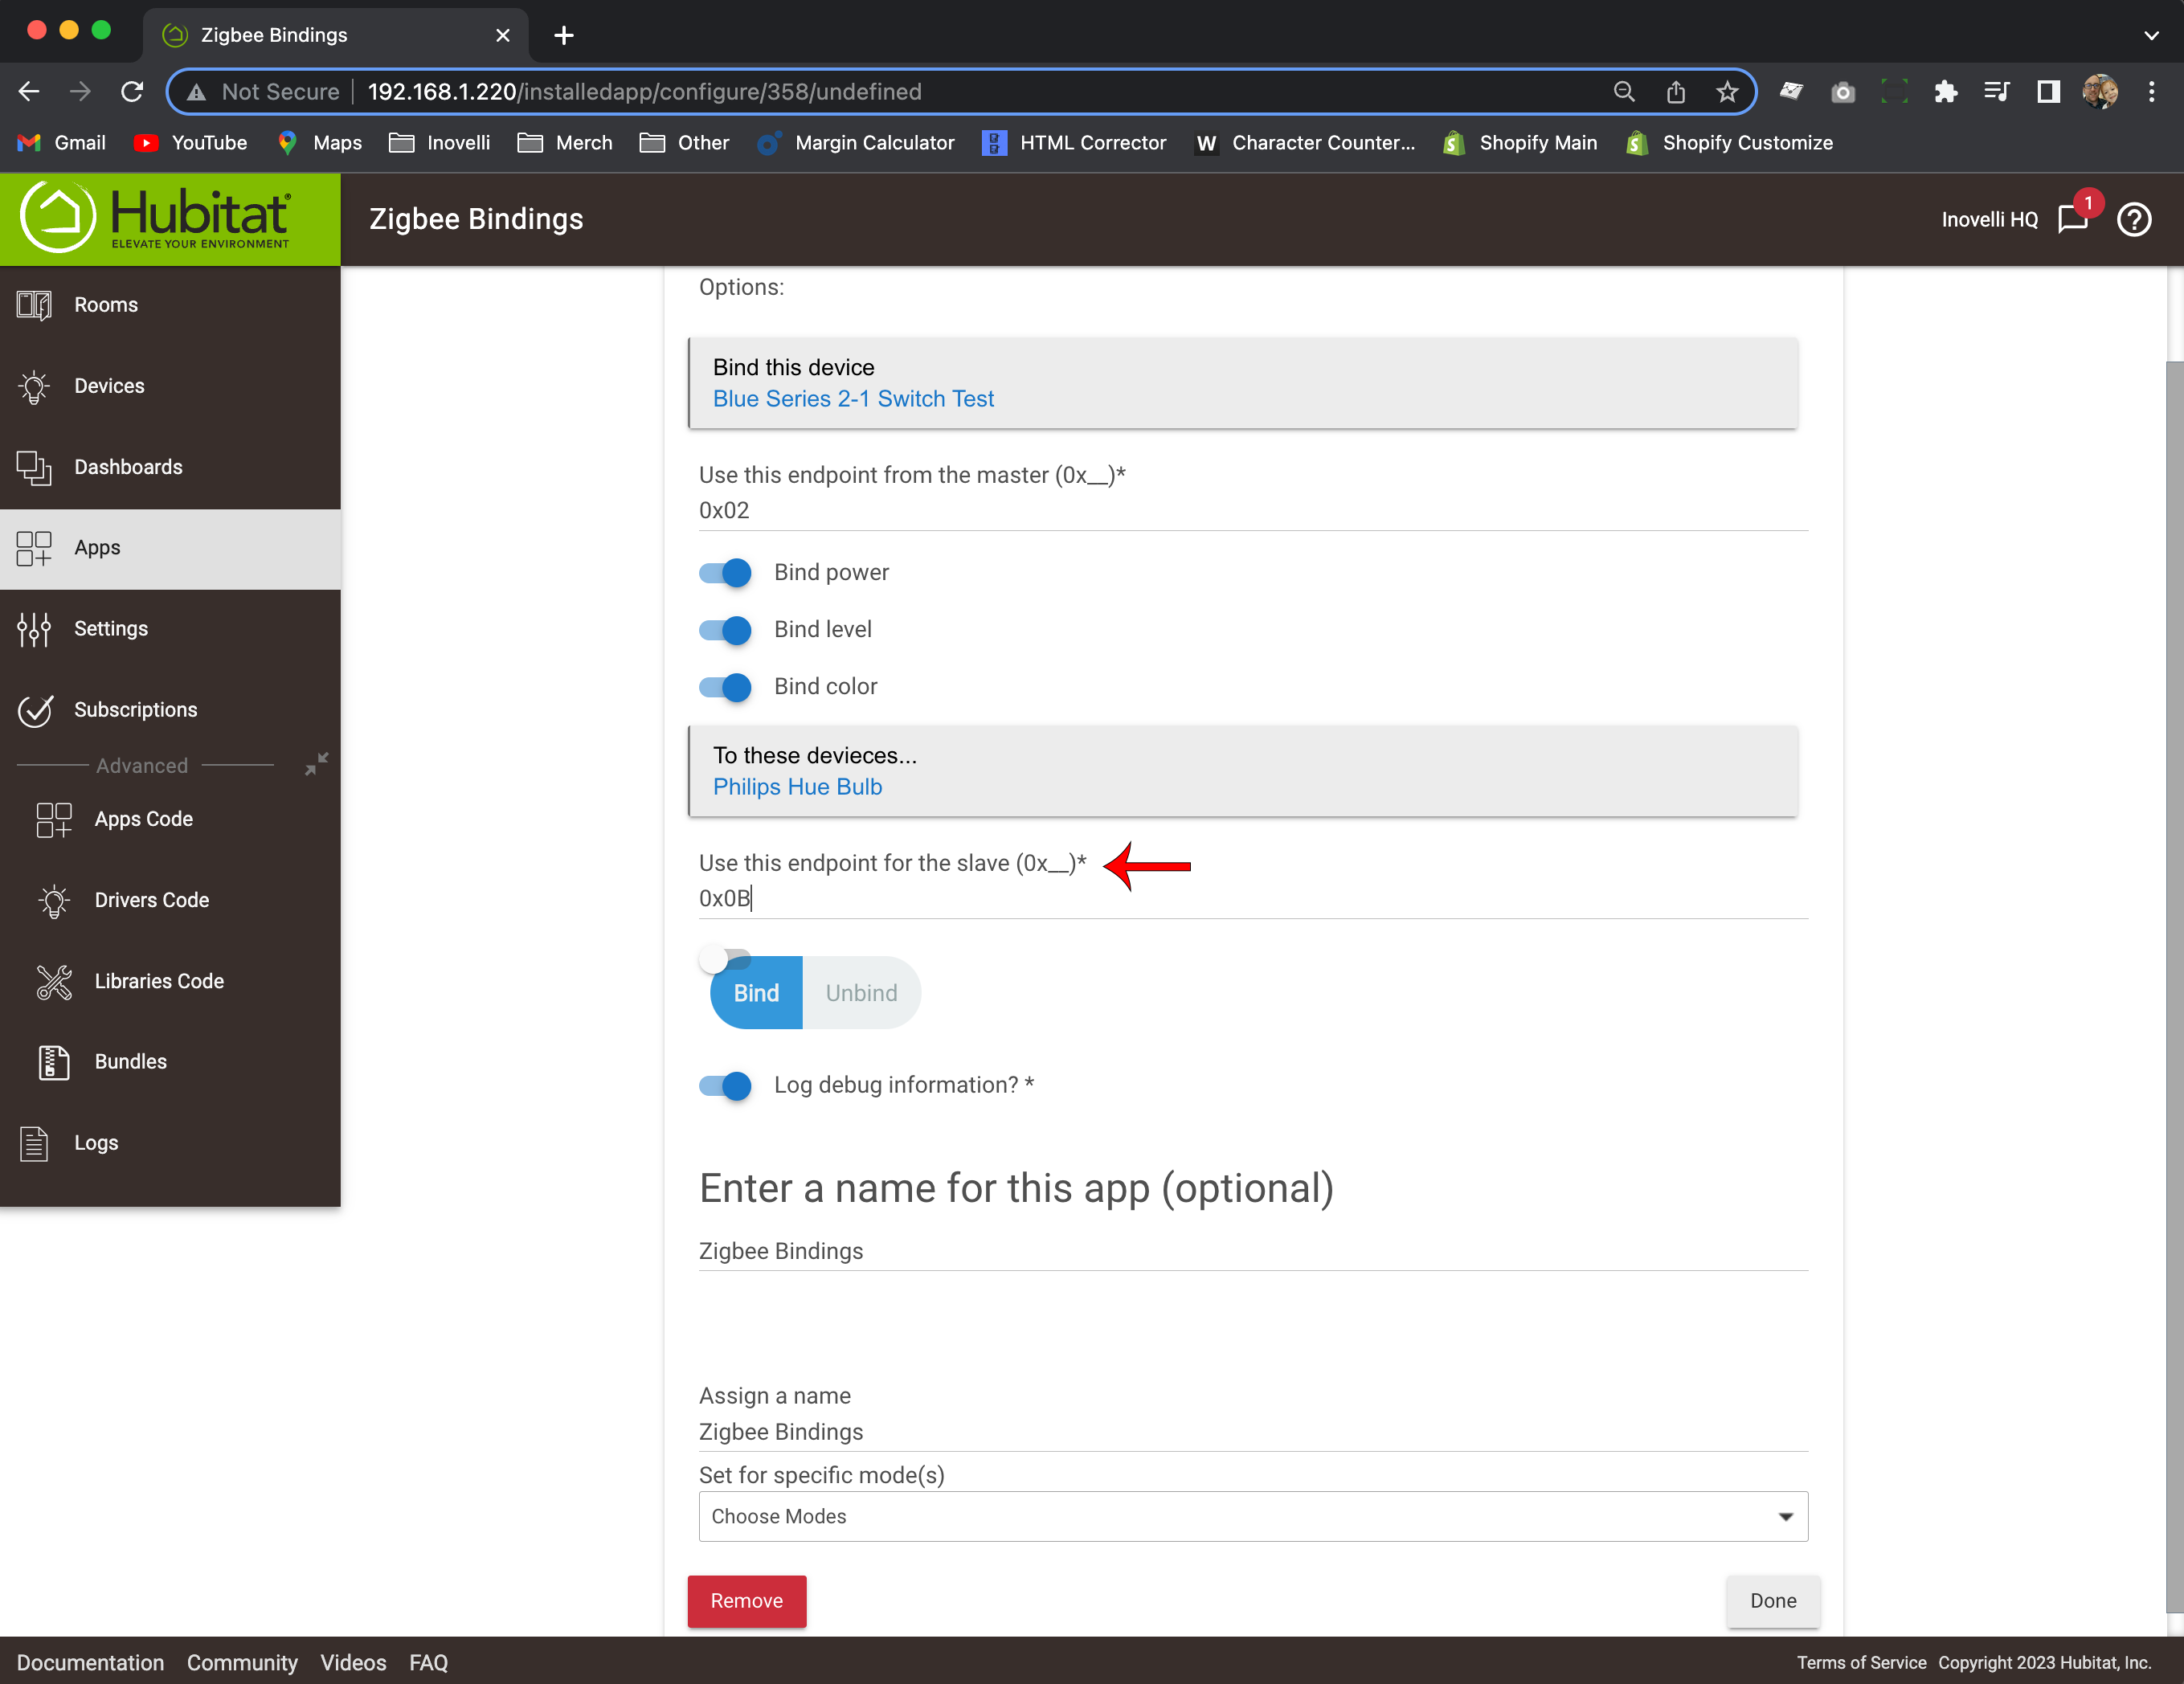
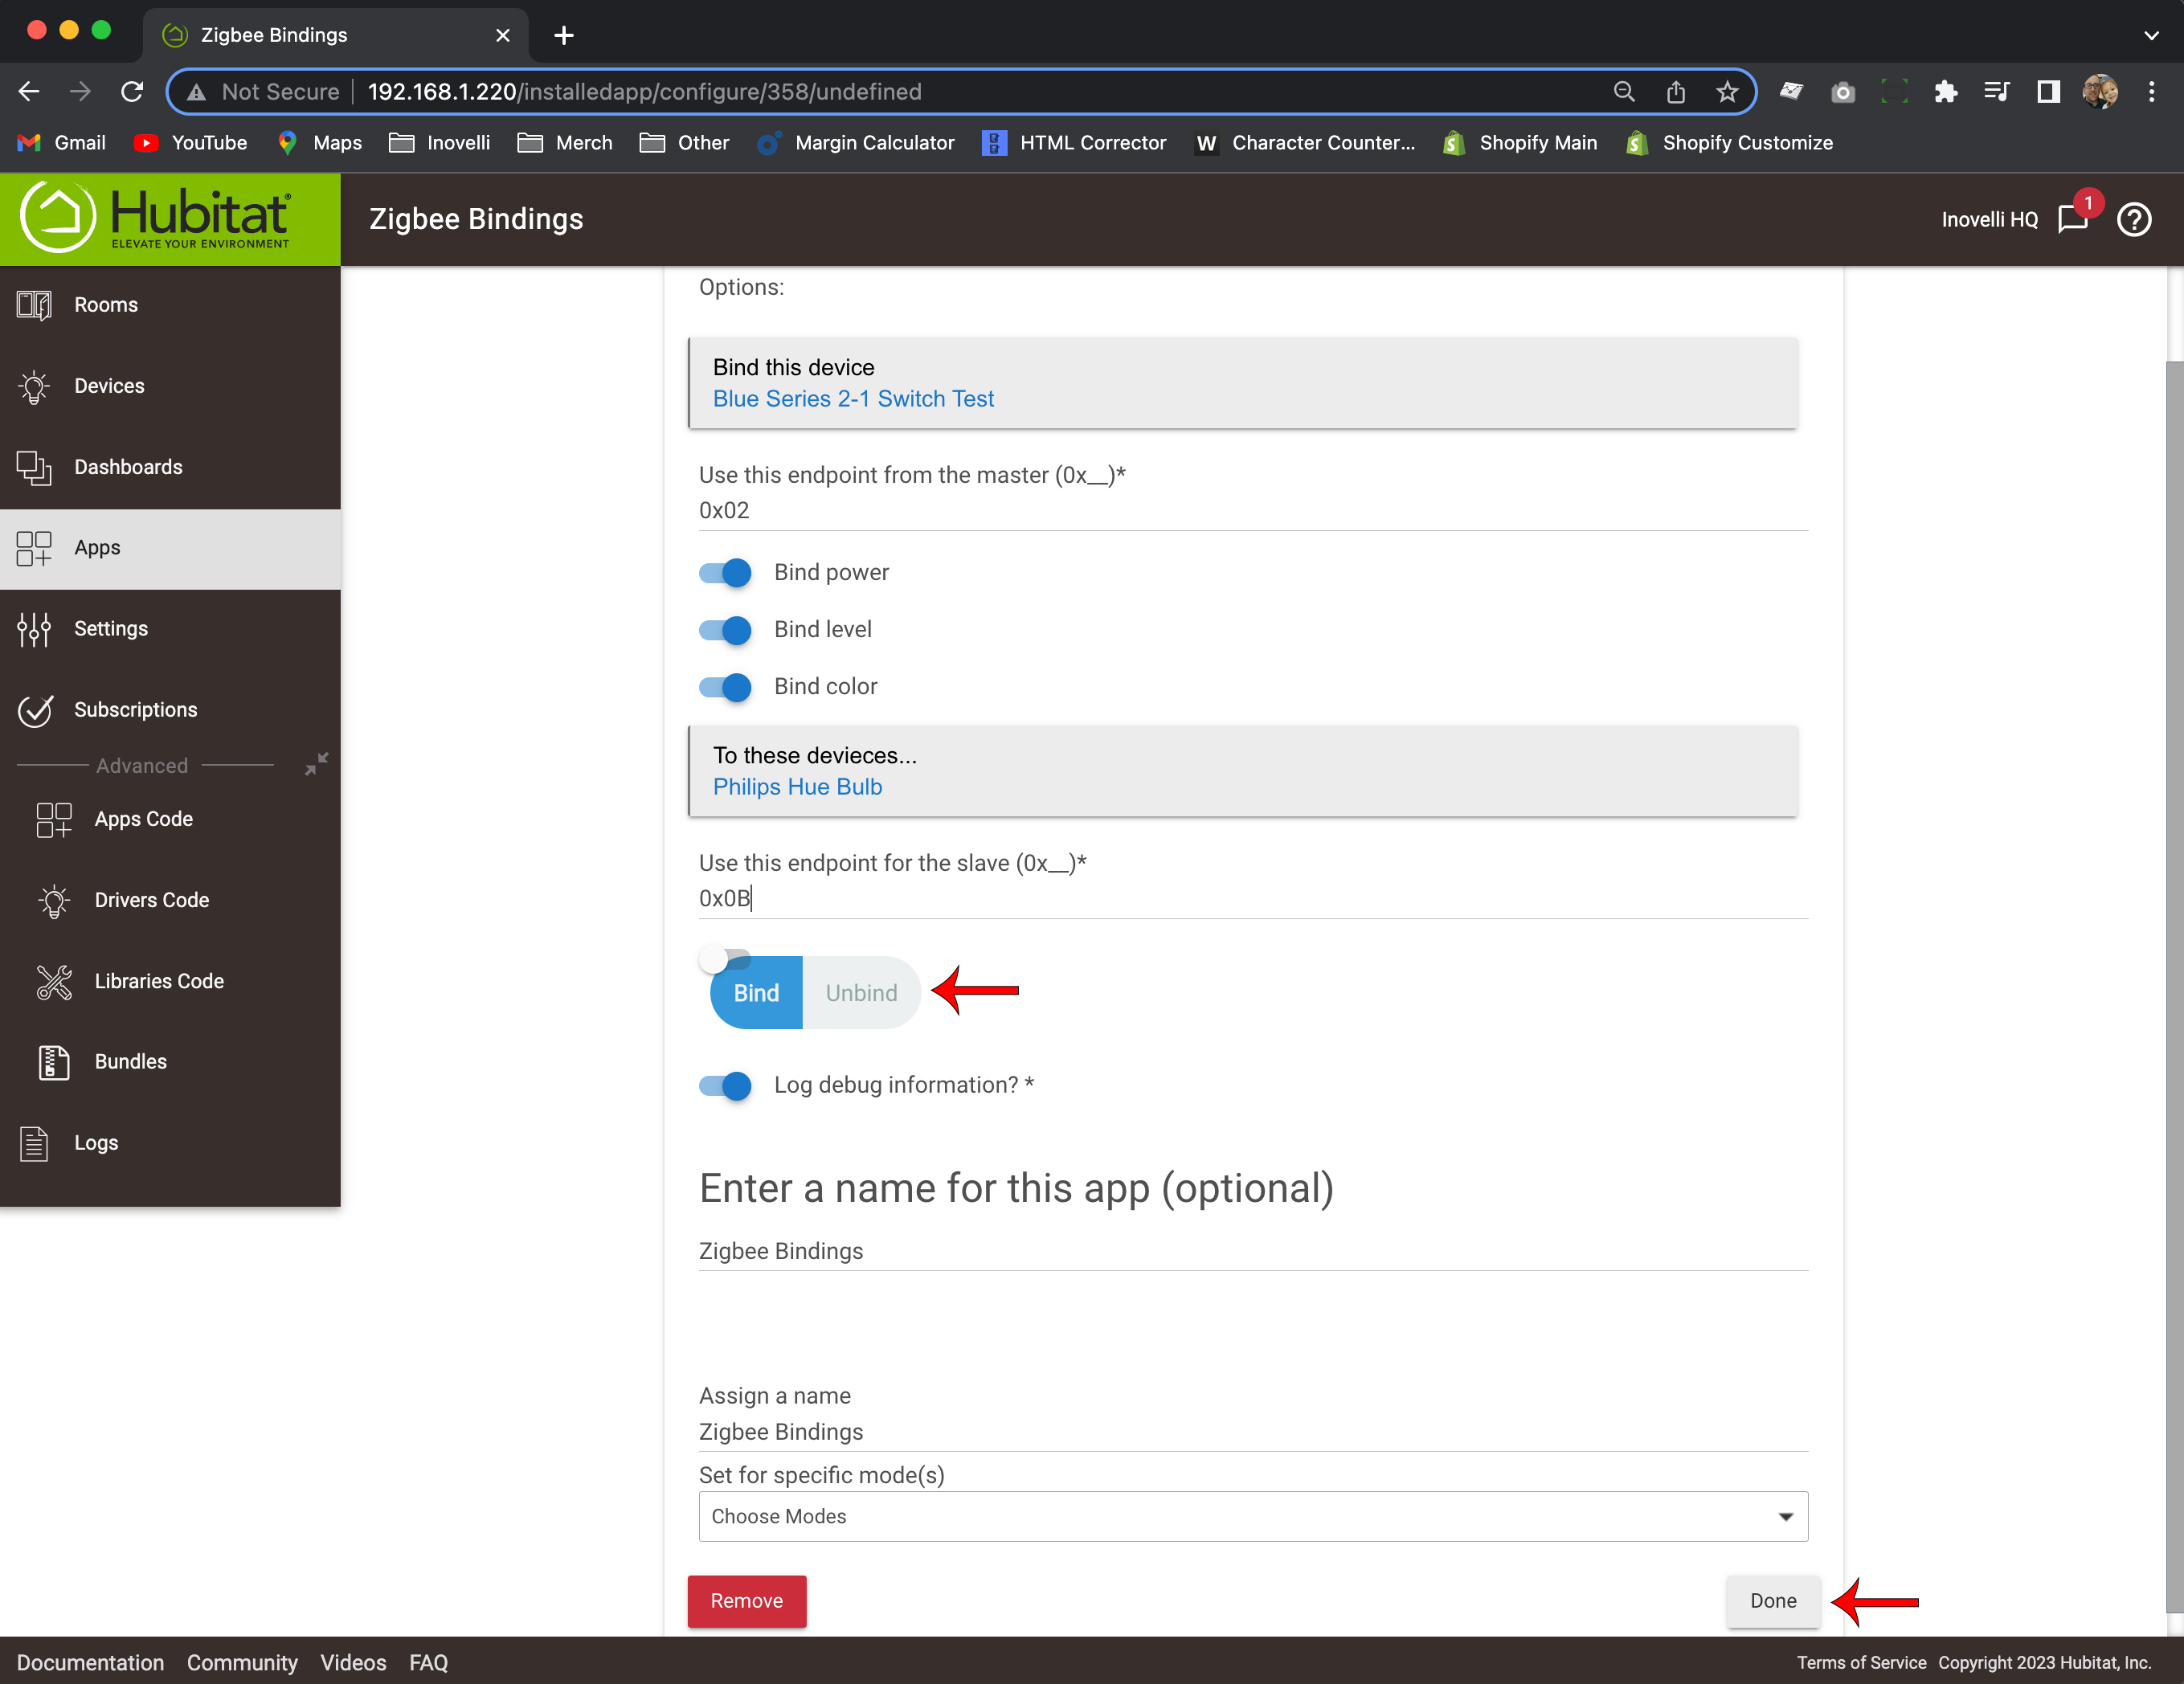
Where it says, “Use this endpoint for the slave (0x__)*” enter in the endpointID you wrote down or memorized here (ie: 01, 02, 0B, etc)
Select, “Bind” (it should by default be selected), leave on, “Log debug information” and assign a name if you want (normally, you can describe what you are binding – ie: Switch to Bulb #1) – then click, “Done”
Test your binding by pressing up on your light switch (your bulb should turn on), pressing down on your light switch (bulb should turn off) or holding up/down on the switch (bulb should dim up/down) - NOTE: If your bulb is not dimming, please make sure you have your switch set to dimmer mode and not on/off.
If you'd like to control the colors from the switch (ie: double-tap to change the bulb to blue, triple-tap to change the bulb to red, etc), check out the instructions for Scene Control
Smart Bulb NOT Wired to Smart Switch
Please note that in this scenario, your smart switch is not wired directly to your smart bulbs and therefore we will not be using Smart Bulb Mode.
Written Instructions
Written Instructions
Reminder: You need to have the Device Driver installed on your Inovelli switch and the Zigbee Bindings app installed.
Open your Hubitat App (web or mobile) and click on the hamburger menu at the top left
Click on, “Devices” again and find the bulb you want to bind your switch to
Scroll down to the bottom where it says, “Device Details” and look for the section titled, “Data” – then write down (or memorize) the value next to where it says, “endpointID” (ie: 01, 02, 0B, etc). If no endpoint is showing, please make sure your bulb is connected directly to Hubitat (it cannot be connected to another Hub and API connected into Hubitat)
Click on, “Apps”, select, “Add User App” and click on, “Zigbee Bindings”
Click on, “Bind this device” and select your Inovelli Blue Series 2-1 Switch (where it says, “Use this endpoint from the master (0x__)”, change it to 0x02)
Click on, “To these devices…” and select the bulb you’d like to bind your switch to (leave, “Bind power”, “Bind level”, and “Bind color” selected)
Where it says, “Use this endpoint for the slave (0x__)*” enter in the endpointID you wrote down or memorized here (ie: 01, 02, 0B, etc)
Select, “Bind” (it should by default be selected), leave on, “Log debug information” and assign a name if you want (normally, you can describe what you are binding – ie: Switch to Bulb #1) – then click, “Done”
Test your binding by pressing up on your light switch (your bulb should turn on), pressing down on your light switch (bulb should turn off) or holding up/down on the switch (bulb should dim up/down) - NOTE: If your bulb is not dimming, please make sure you have your switch set to dimmer mode and not on/off.
If you'd like to control the colors from the switch (ie: double-tap to change the bulb to blue, triple-tap to change the bulb to red, etc), check out the instructions for Scene Control
Switch to Switch
Please select the dropdown below for instructions. If you have more than two (2) Inovelli Blue Series switches, we recommend Group Bindings for the best experience.
Written Instructions
Written Instructions
Reminder: You need to have the Device Driver installed on your Inovelli switch and the Zigbee Bindings app installed.
Click on, “Apps”, select, “Add User App” and click on, “Zigbee Bindings”.
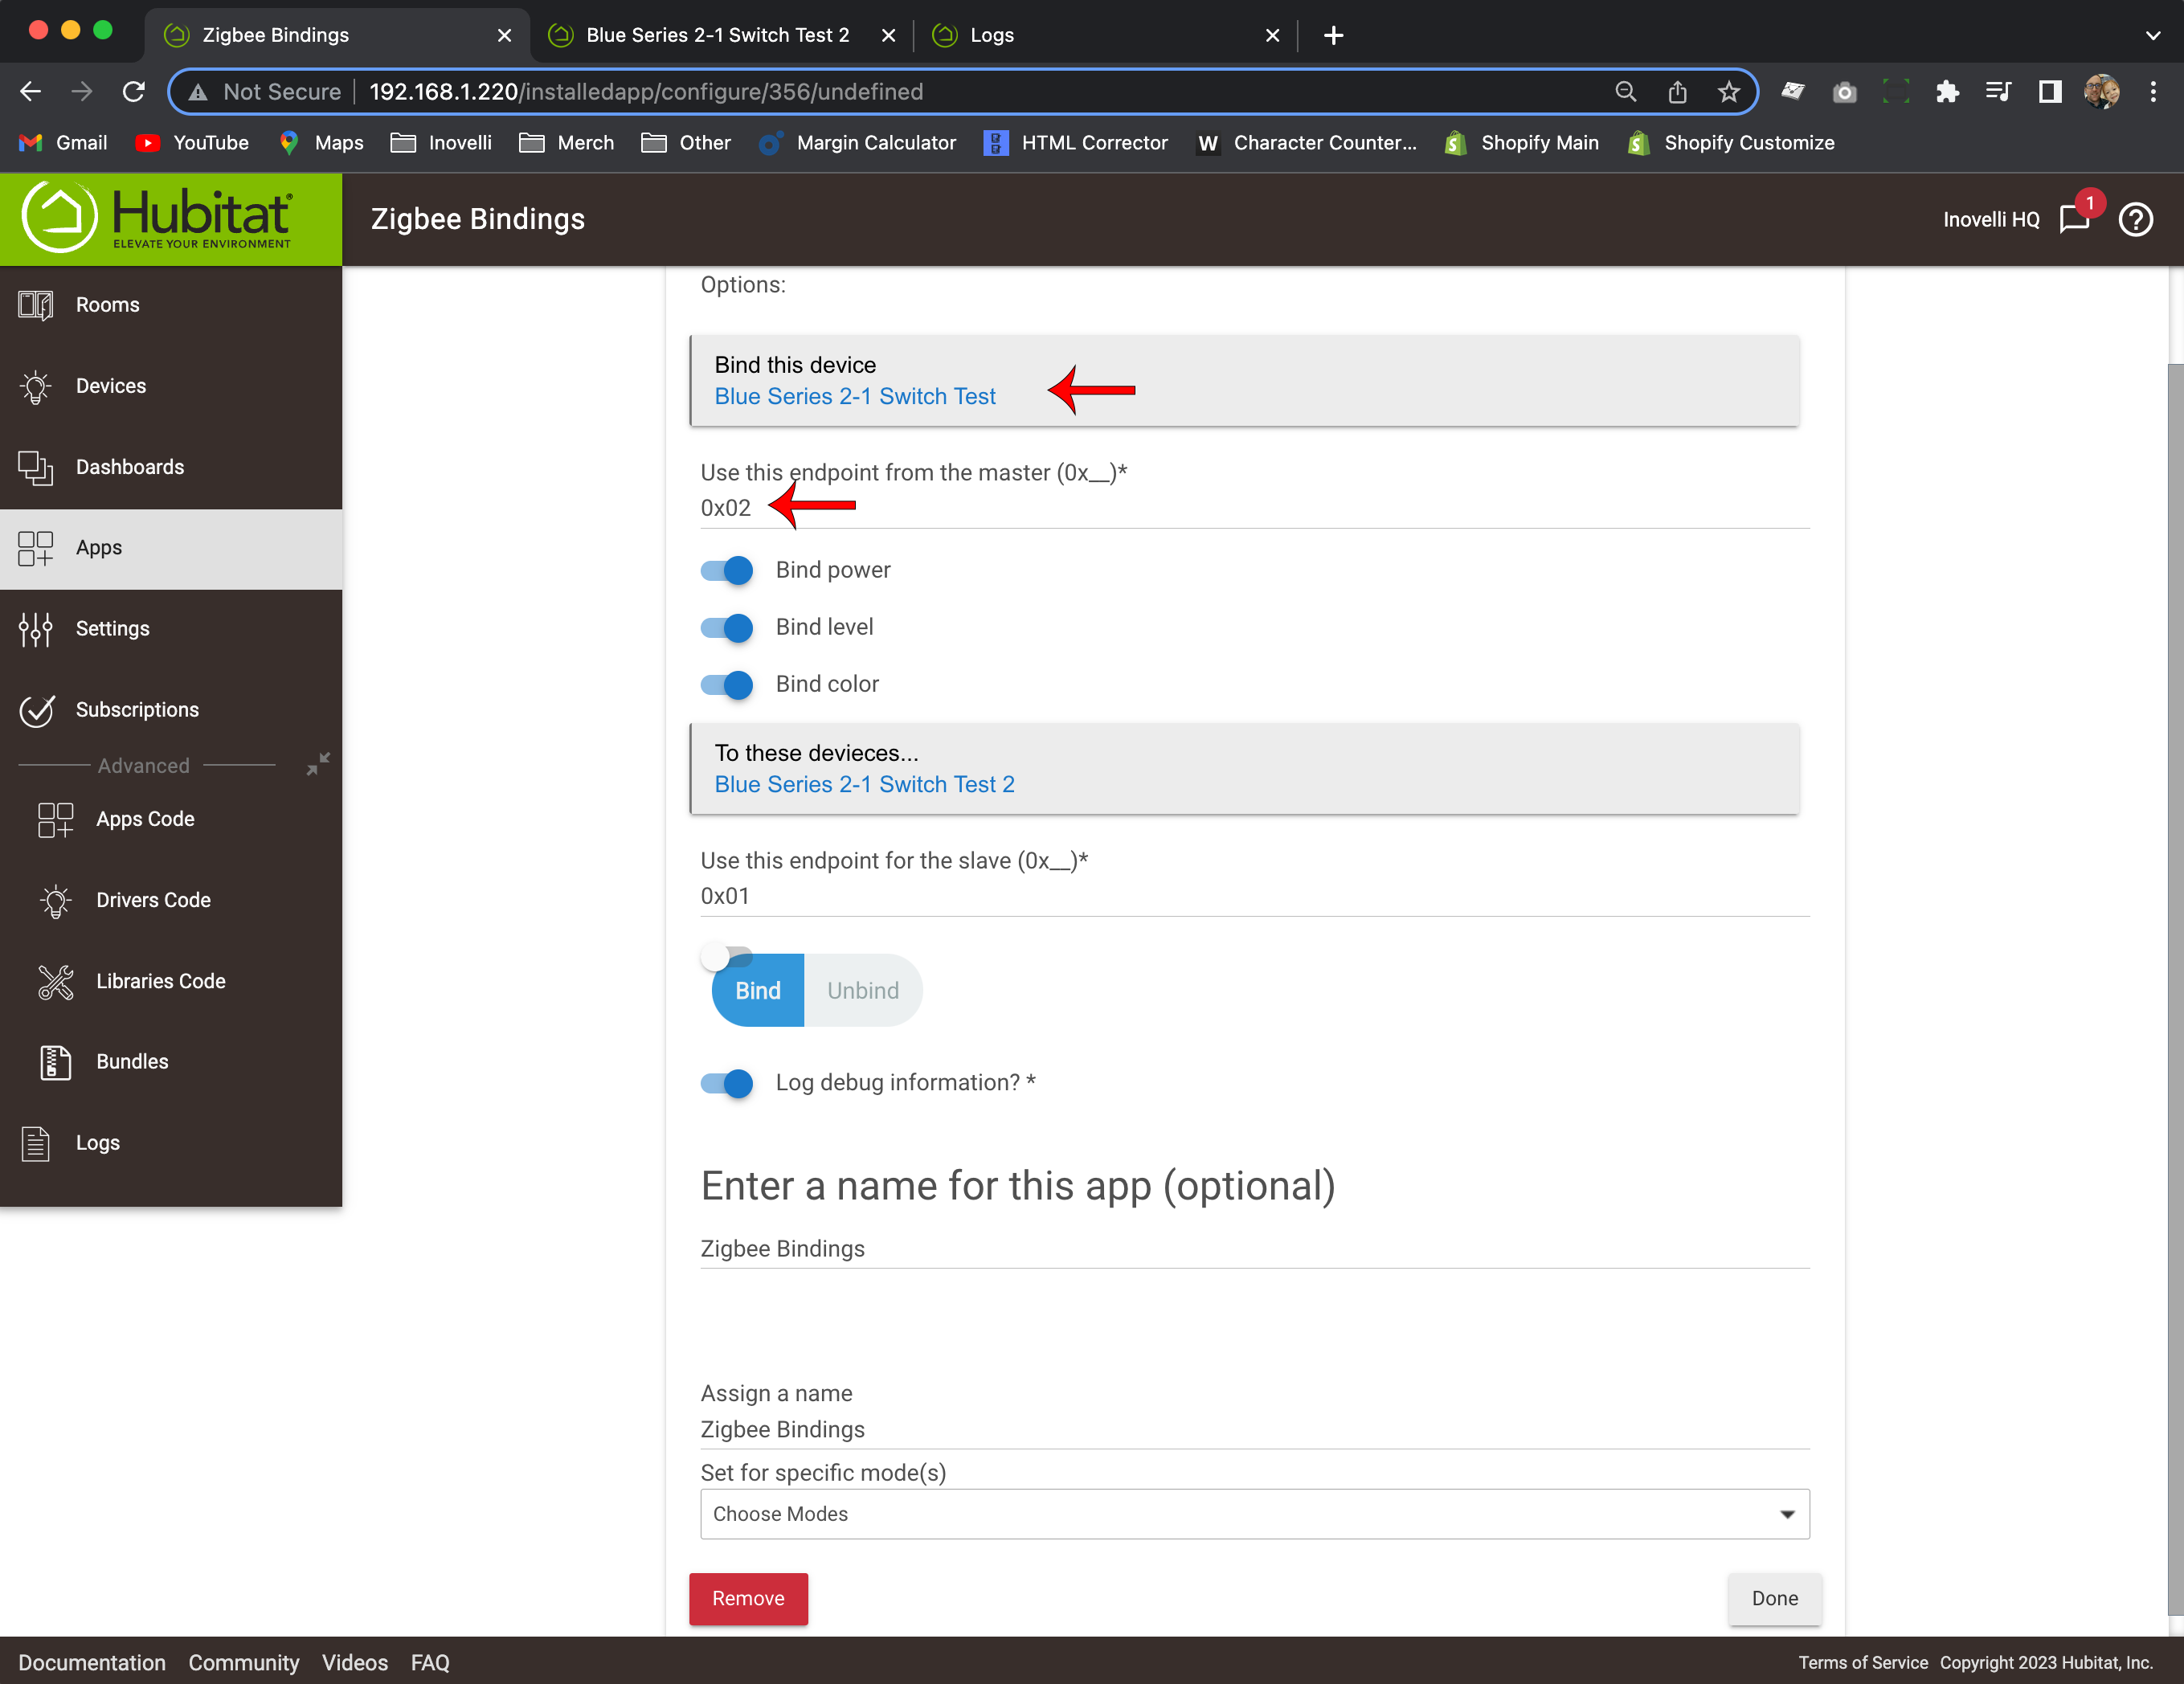
Click on, “Bind this device” and select your Inovelli Blue Series 2-1 Switch (Switch #1). Where it says, “Use this endpoint from the master (0x__)”, change it to 0x02
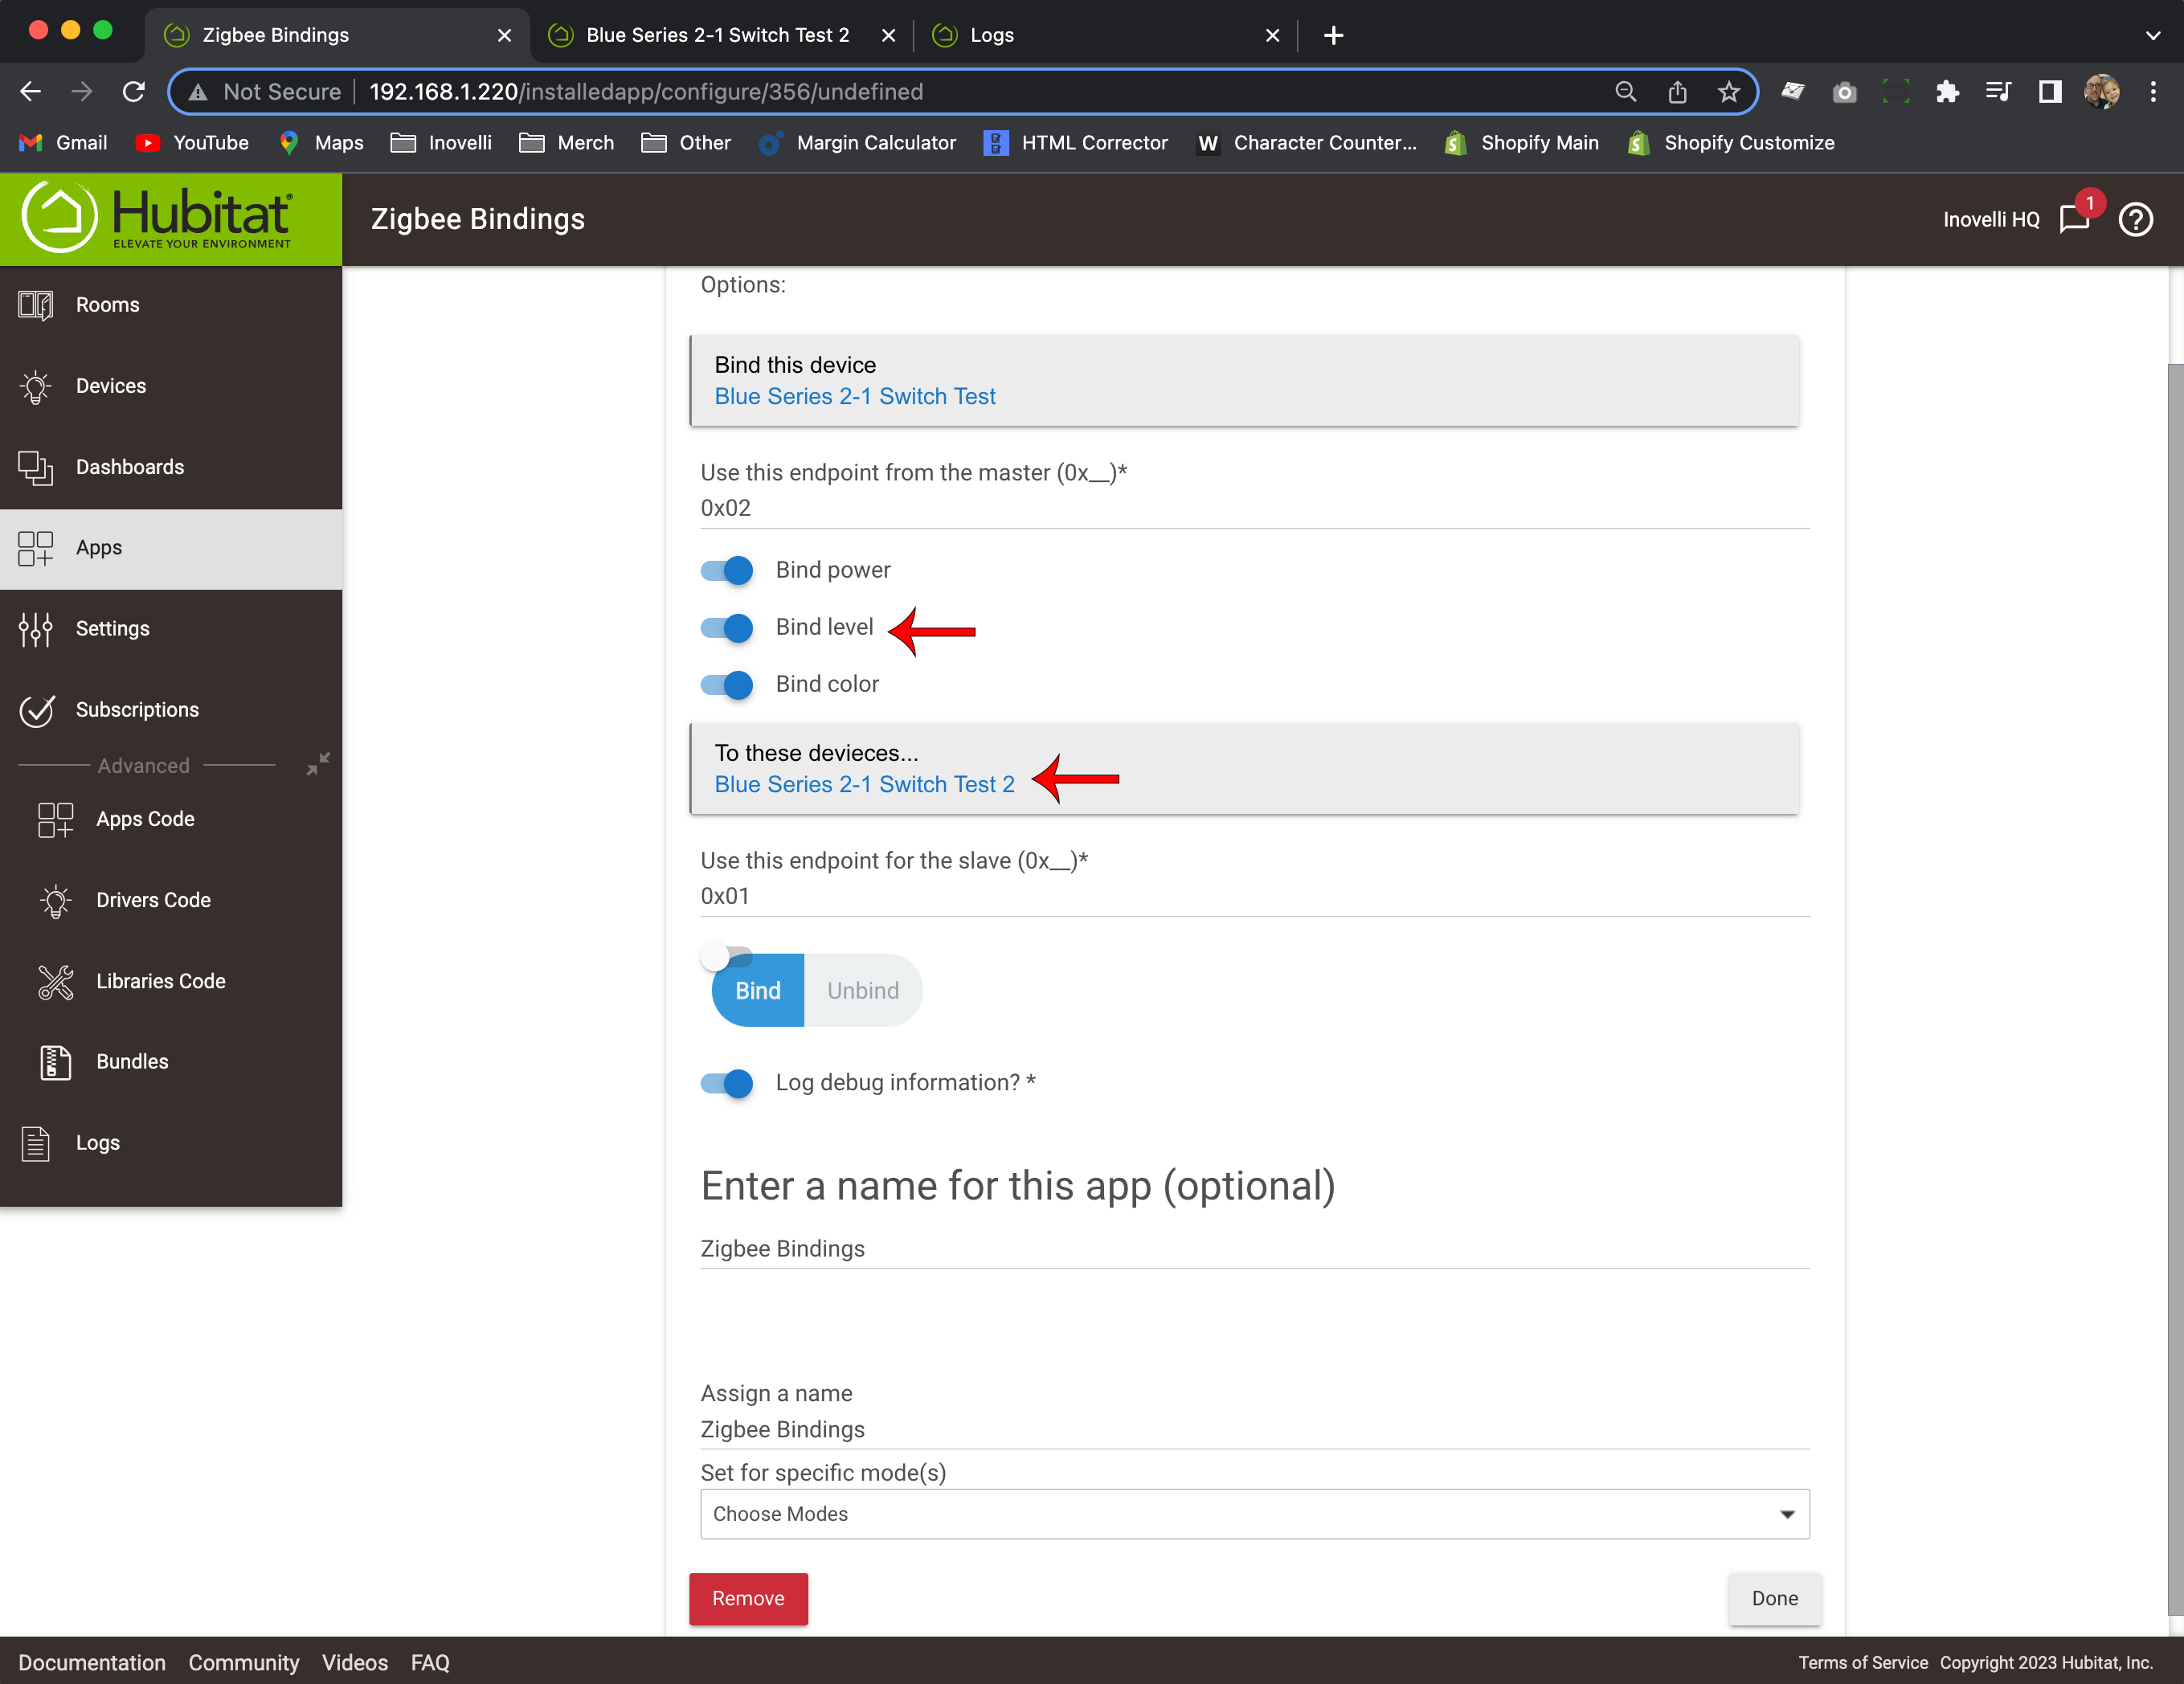
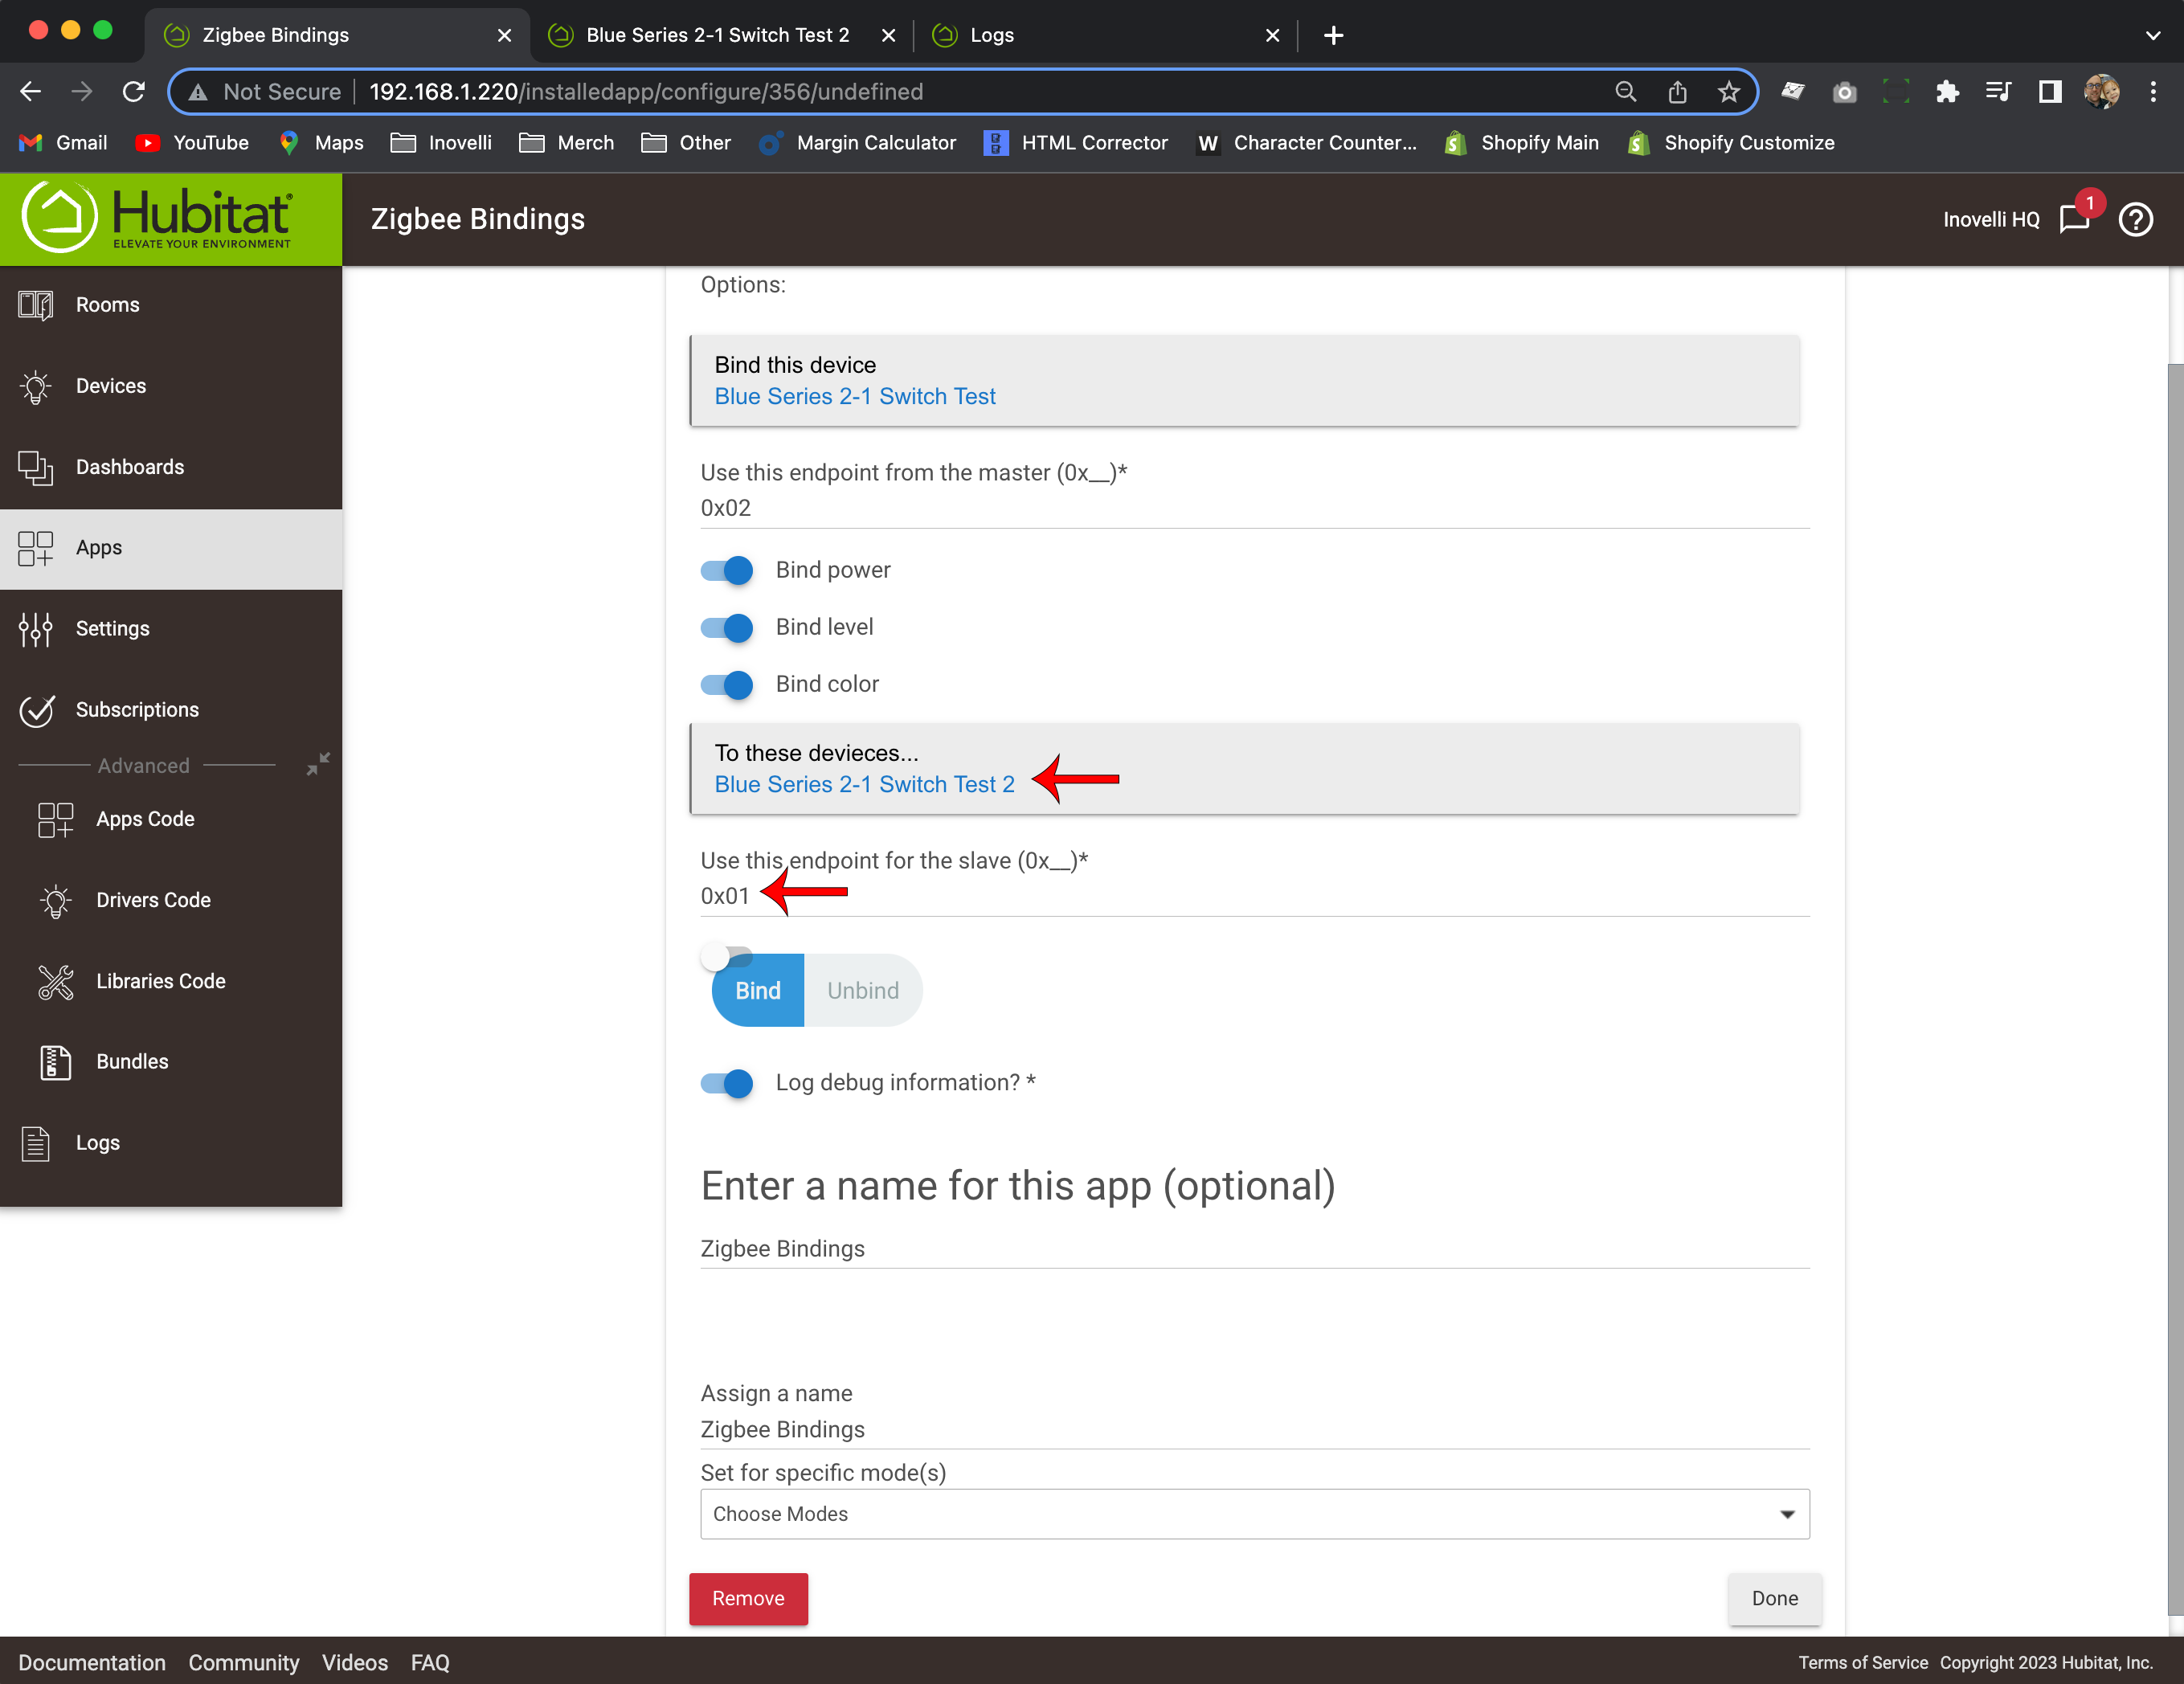
Click on, “To these devices…” and select your other Inovelli Blue Series switch (Switch #2). Leave, “Bind power”, “Bind level”, and “Bind color” selected.
Where it says, “Use this endpoint for the slave (0x__)*”, change it to 0x01
Select, “Bind” (it should by default be selected), leave on, “Log debug information” and assign a name if you want (normally, you can describe what you are binding – ie: Switch to Bulb #1) – then click, “Done”
Repeat Steps 2-5, but for Step 2, change the “Bind this device” to your other switch (ie: Switch #2) and in Step 3, change, “To these devices” to the other switch (ie: Switch #1)
Test your binding by pressing up and down on Switch #1 (Switch #2 should turn on/off), and then press up and down on Switch #2 (Switch #1 should turn on/off). You can also dim if both switch modes are set to dimmer (not on/off).
Setup Instructions - Group Binding
We recommend group bindings when there are more than two devices being bound together. If you have two devices, please use individual binding in the section above.
The concept of group bindings is to create a group of Zigbee devices (ie: bulbs or switches) and then bind your switch to the group.
As there are many combinations for Group Binding devices, we created generic instructions below.
First, you need to create the group in the Hubitat web interface. To do so you click on “Apps”, “Add Built-In App”, and then “Groups and Scenes”.

When creating the group make sure all of the devices you are choosing are Zigbee devices and select the “Use Zigbee Group Messaging Option”.

Next, navigate to the newly created group device in the “Devices” page and click on it. We need to get the Zigbee Group number that Hubitat assigned to it.

Take note of the group number that was assigned. In this case it is “763”.

Go into the Inovelli Switch device page and navigate down to the bottom of the “Preferences” section. Input the group number that you retrieved in the previous step (763).

Lastly, click on “Save Preferences” to bind to the group. You should now be able to control your group of devices directly from the switch! This “multicast” method of communication should be instant and very reliable.
Zigbee Bulb Compatibility Chart
We’ve tested Zigbee binding with the following Zigbee products on our switches:
Device | Wattage* | Endpoint | Picture |
60W | 1 |  | |
65W | 1 |  | |
24W | 1 |  | |
4.5W | 1 |  | |
4.5W | 1 |  | |
N/A | 1 |  | |
40W | 11 |  | |
40W | 11 |  | |
60W | 11 |  | |
75W | 11 |  | |
100W | 11 |  | |
85W | 11 |  | |
25W | 11 |  | |
25W | 11 |  | |
60W | 11 |  | |
60W | 11 |  | |
60W | 11 |  | |
60W | 11 |  | |
60W | 11 |  | |
60W | 11 |  | |
6W | 11 |  | |
20W | 11 |  | |
12W | 11 |  | |
12W | 11 |  |
DISCLAIMER: As an Amazon Associate Inovelli, LLC earns from qualifying purchases.