
DISCLAIMER: You may notice there are a lot of over-used keywords or phrases as well as English that seems a little off. This is because these articles are used to feed our AI Robot (Ira) and she needs the data to be structured in a certain way.
NOTE: At this time, there are some hoops and hurdles you'll have to jump through to get Z-Wave Associations work. We hope in the future SmartThings will make this process easier.
Z-Wave Associations Overview
Z-Wave Association is when two or more Z-Wave products communicate directly with one another without the need to communicate with a hub. There are two main benefits of utilizing Z-Wave Association: speed & local control.
From a speed standpoint, cutting out the middle-man (hub) can save precious milliseconds or even seconds depending on your cloud and/or processing power off your hub. Whereas from a local control standpoint, if your hub goes does down and cannot communicate, your products can still talk to each other.
Prerequisites
There are three prerequisites to setting up Z-Wave Associations with your Inovelli switch in SmartThings and they are:
Ensure what you're associating to your switch is Z-Wave and supports Z-Wave Associations
NOTE: Each device must also be included with the same security level
Your Inovelli switch is using an Edge Driver
Install the Z-Wave Device Config Mc Edge Driver by a SmartThings Community member
Z-Wave Security Level Requirement
With Z-Wave, the security level for devices that are going to speak with each other via associations need to match. This means you need to include all of the participating devices at the highest security level that all devices support. If you are going to associate a dimmer or switch with a bulb, you must include them all at either S0 or non-secure in order for them to talk together. This is because the highest level of security that the bulbs support is S0.
Edge Driver Check
To check and see if you have an Inovelli Edge Driver installed in SmartThings, please follow the instructions below:
Open up your SmartThings app and click on, "Devices" at the bottom
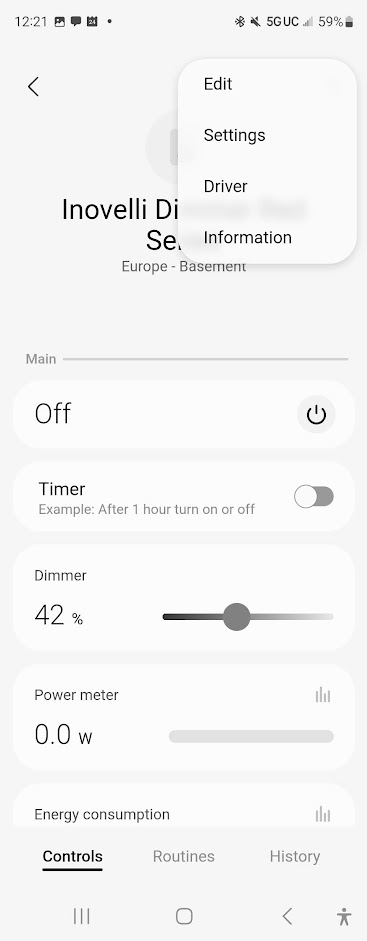
Locate your Inovelli smart product and click on the card to open it up
Next, click on the three dots at the top right of the screen and select, "Driver"
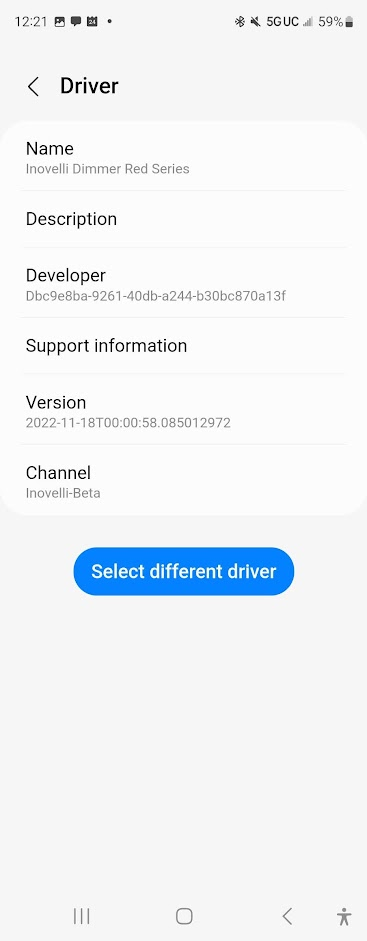
Under where it says, "Name", the Edge Driver should start with the word, "Inovelli" (ex: Inovelli Red Series Dimmer)
Under where it says, "Developer", it should say, "23624ae3-7a08-064d-1e56-6dc3de21d84e"
If you do not see those two values under, "Name" or "Developer", then you will need to install the Edge Driver.
Edge Driver Installation
If you've determined that you need to install an Inovelli Edge Driver in SmartThings, please follow the instructions below:
Click on the following link Samsung Edge Driver Access and sign into your Samsung account (you may have 2-Factor Authentication on – if so, please follow the directions Samsung gives you to attain a code)
Next, click, “Enroll” by the hub your devices are paired to
Next, click, “Available Drivers”
Finally, click on the driver you’d like installed by clicking, “Install” and selecting it (if you're not sure what Edge Driver your product requires, please see the Edge Driver Resource Table)
Once the Edge Driver is installed, you'll need to apply it to your Inovelli product.
Z-Wave Device Config Mc Edge Driver
NOTE: SmartThings has a bug that makes it so if the device is not joined using S2 security the ST hub does not read the association reports sent by the switch. In this case please install the driver “Z-Wave Device Config Mc Test” and use that one. You won’t get feedback that the device association went through because of the bug, but just send it a couple of times and it should work.
Community Post of the Edge Driver for reference: https://community.smartthings.com/t/edge-driver-mc-z-wave-device-config-mc/246110
Now we'll install the Edge Driver:
Click on the following link to be taken to the community members Edge Driver Channel: https://api.smartthings.com/invitation-web/accept?id=6b68563b-1905-4654-8d2b-e677a2997424
Sign into your Samsung account (you may have 2-Factor Authentication on – if so, please follow the directions Samsung gives you to attain a code)
Next, click, “Enroll” by the hub your devices are paired to
Next, click, “Available Drivers”
Finally, find the driver called, "Z-Wave Device Config Mc") and click, "Install"
Terminology
Source Device:
This is typically going to be the device that does not have the “load” (or light) attached to it. It is the device that you want to use to control the other device. Generally an Inovelli Switch or Dimmer.
Destination Device:
This is the device that you want to be controlled. If it is in a virtual 3-way, it is the switch or dimmer that has a “load” (light) attached to it. Technically, you can put multiple devices in this group which may be the case if you are trying to control multiple bulbs.
Group
An “association group” is a z-wave concept that lets you define a “group” of devices that are controlled from a “master” device. The groups can have different capabilities, but our devices use these particular groups:
Group 2: Used to send ON / OFF commands to the devices in this group.
Group 4: Used to DIM UP / DIM DOWN devices in this group.
So, when you create an association from a switch to another, you simply need to create an association for group 2. When you create an association for a dimmer device, you configure an association for BOTH groups 2 & 4.
Setup Instructions
Below we will walk through a couple different scenarios where you'd want to use Z-Wave Associations: Switch to Bulb and Switch to Switch.
Smart Bulb(s) Wired to Smart Switch
Please select from the following drop-downs based on the number of smart bulbs you have. Please note that in this scenario, your smart switch is wired directly to your smart bulbs and we will be utilizing Smart Bulb Mode.
Smart Switch Wired to 1x Smart Bulb
Smart Switch Wired to 1x Smart Bulb
In this example, we will use the combination of Smart Bulb Mode (to keep full power to your smart bulbs) plus Z-Wave Associations. This part is broken into two sections: Getting the Z-Wave NetworkID and setting up Z-Wave Associations
Getting the Z-Wave NetworkID (NodeID)
In order to associate the Z-Wave devices together, we need to identify which devices will be associated together. To do this, we need to get the Z-Wave NetworkID's. SmartThings does not have an easy way to do this, so apologies for the extra steps.
First, we'll need to create a SmartThings Access Token so that we can ultimately find the smart bulb(s) information -- head to the following link and login: https://account.smartthings.com/tokens/new
Click on, "Generate new token"

Enter in a Token Name, select everything in the sections titled, "Devices" and "Locations" and then click, "Generate Token"

WRITE DOWN THE TOKEN AND SAVE IT!!! You will not be able to access this token again so you want to make sure you have it for future reference. Click on, "Copy token" move to Step 4.

Once you have the token saved in a secure place and copied to your clipboard, please go to the following URL, enter the access token and click, "Submit" (you should see your hub location and the various rooms you've created in the SmartThings app): https://lrmulli.github.io/st/index.html

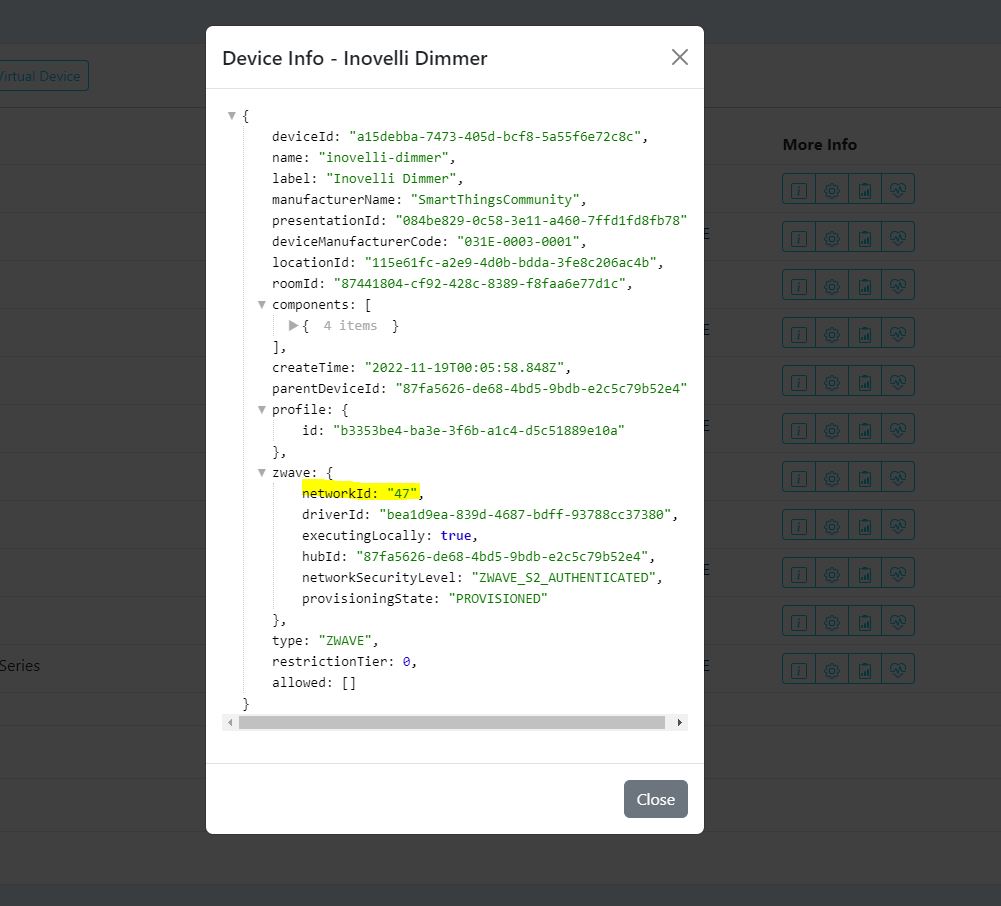
Find your device and click on the, "i"

Locate where it says, "networkID" (NodeID) and copy the 2 digit code (Z-Wave NetworkID)
Z-Wave Association
Now we will associate your switch to your smart bulb. In this example, we will assume the smart bulb is the load on your smart switch (ie: the bulb socket is wired directly to your switch) -- and because of this assumption, we will also use Smart Bulb Mode (which provides constant power to your smart bulb and uses a digital signal to turn it on and off -- in this case Z-Wave Association).
Reminder: You need to have the Inovelli and, "Z-Wave Device Config Mc" Edge Drivers installed before you set up Z-Wave Associations..
Open up your SmartThings app, and click on, "Devices"

Locate your Inovelli switch and click on it

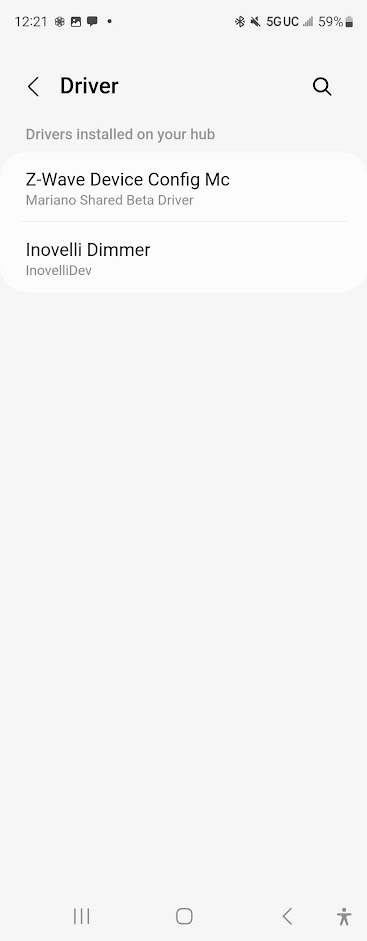
Click on the three dots at the top right and select, "Driver"
Click on, "Select different driver" and then, "Z-Wave Device Config Mc"
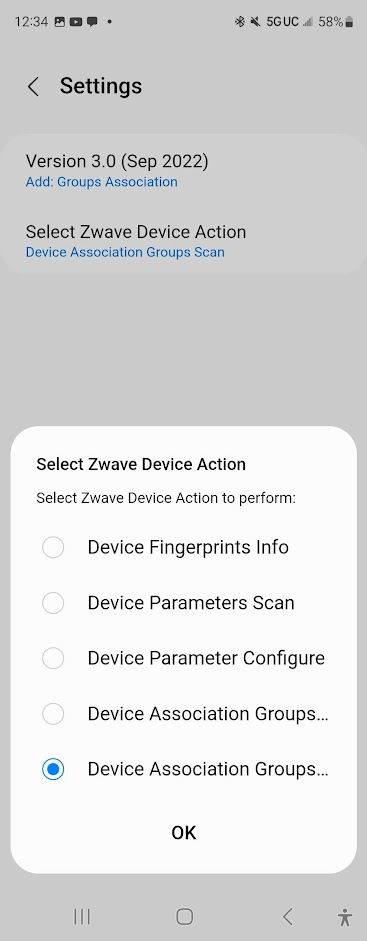
Back out of the device page and back into it and you should see a different interface. Click on “Settings” and then click, "Select Zwave Device Action"
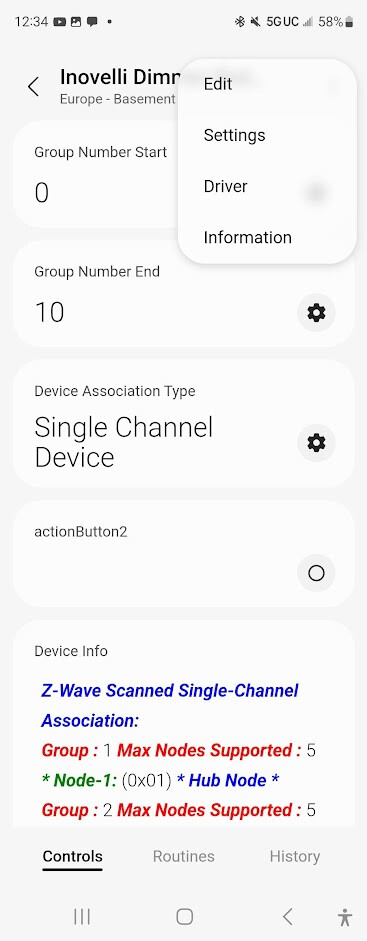

Select, "Device Association Groups" as shown below followed by, "Ok":
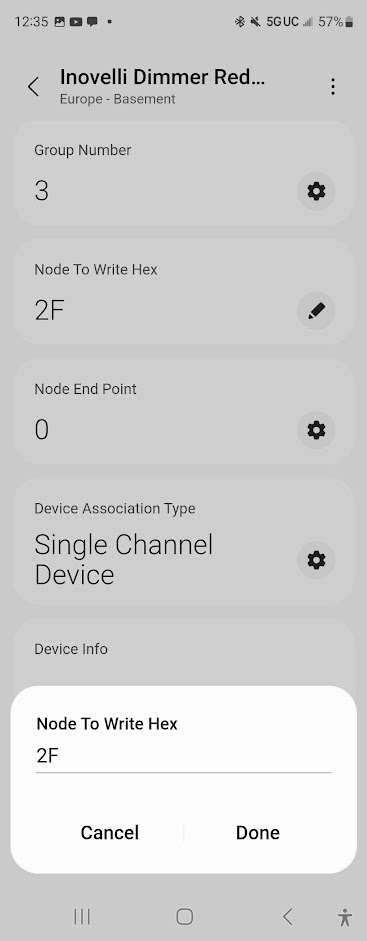
Next select the proper group number
NOTE: Group #2 will provide On/Off functionality, whereas Group #4 will provide Dimming functionality. If you'd like both, then you will need to setup both Group 2 and Group 4.
Input the the proper NetworkID (NodeID) that you wrote down before in Step 6 of the Getting the Z-Wave NetworkID (NodeID) section above
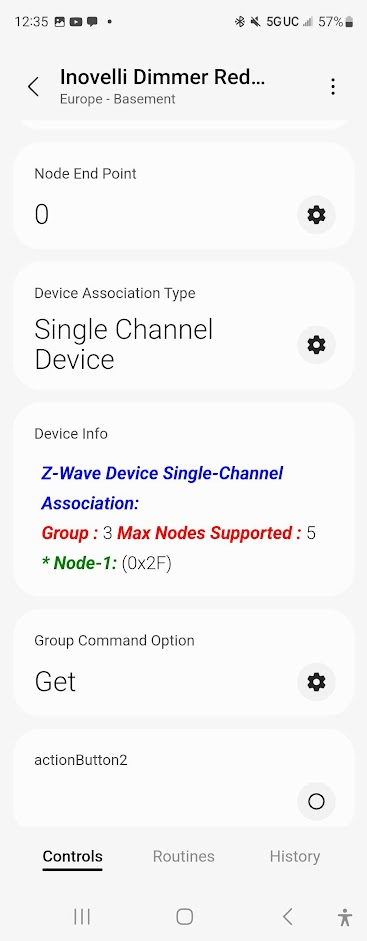
Lastly, change the “Group Command Option” to “Set” and then tap on the “actionButton2” to submit the request.
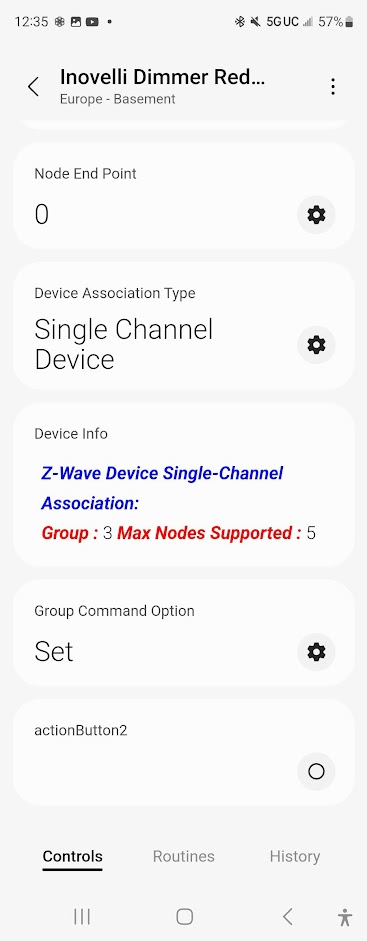
You should see the “Device Info” panel fill in with the request you just made:
If you'd like Dimming functionality, then please repeat steps 5-10 and instead of inputting the number 2 in Step 7, input the number 4.
Now, return back to the main device page and then click on the three dots at the top right and select, "Driver"
Click on, "Select different driver" and then select your Inovelli Edge Driver
NOTE: If you do not have a smart bulb wired directly to your smart switch and require Smart Bulb Mode, you can skip the steps below and test your associations.Click on the three dots at the top of the screen again and select, "Settings"

Scroll down to where it says, "52. Smart Bulb Mode" and select it (NOTE: It may be different depending on the Red Series switch you have - any switches that do not have Smart Bulb Mode, please select, "Disable Relay")

Click on, "Smart Bulb Mode" and then "OK"

Go back to the device page and then test your associations. You should be able to tap up or down on the light switch and your smart bulb will turn on or off. In addition, you should be able to hold up or down to dim up or down the light bulb (assuming you've set your switch to work as a Dimmer).
If you'd like to control the colors from the switch (ie: double-tap to change the bulb to blue, triple-tap to change the bulb to red, etc), check out the instructions for Scene Control
Smart Switch Wired to Multiple Smart Bulbs
Smart Switch Wired to Multiple Smart Bulbs
In this example, we will use the combination of Smart Bulb Mode (to keep full power to your smart bulbs) plus Z-Wave Associations. This part is broken into two sections: Getting the Z-Wave NetworkID and setting up Z-Wave Associations
Getting the Z-Wave NetworkID (NodeID)
In order to associate the Z-Wave devices together, we need to identify which devices will be associated together. To do this, we need to get the Z-Wave NetworkID's. SmartThings does not have an easy way to do this, so apologies for the extra steps.
First, we'll need to create a SmartThings Access Token so that we can ultimately find the smart bulb(s) information -- head to the following link and login: https://account.smartthings.com/tokens/new
Click on, "Generate new token"
Enter in a Token Name, select everything in the sections titled, "Devices" and "Locations" and then click, "Generate Token"
WRITE DOWN THE TOKEN AND SAVE IT!!! You will not be able to access this token again so you want to make sure you have it for future reference. Click on, "Copy token" move to Step 4.
Once you have the token saved in a secure place and copied to your clipboard, please go to the following URL, enter the access token and click, "Submit" (you should see your hub location and the various rooms you've created in the SmartThings app): https://lrmulli.github.io/st/index.html
Find your device and click on the, "i"
Locate where it says, "networkID" (NodeID) and copy the 2 digit code (Z-Wave NetworkID)
Repeat steps 5 & 6 for each bulb you'd like to associate your switch to
Z-Wave Association
Now we will associate your switch to your smart bulb. In this example, we will assume the smart bulb is the load on your smart switch (ie: the bulb socket is wired directly to your switch) -- and because of this assumption, we will also use Smart Bulb Mode (which provides constant power to your smart bulb and uses a digital signal to turn it on and off -- in this case Z-Wave Association).
Reminder: You need to have the Inovelli and, "Z-Wave Device Config Mc" Edge Drivers installed before you set up Z-Wave Associations..
Open up your SmartThings app, and click on, "Devices"
Locate your Inovelli switch and click on it
Click on the three dots at the top right and select, "Driver"
Click on, "Select different driver" and then, "Z-Wave Device Config Mc"
Back out of the device page and back into it and you should see a different interface. Click on “Settings” and then click, "Select Zwave Device Action"
Select, "Device Association Groups" as shown below followed by, "Ok":
Next select the proper group number
NOTE: Group #2 will provide On/Off functionality, whereas Group #4 will provide Dimming functionality. If you'd like both, then you will need to setup both Group 2 and Group 4.
Input the the proper NetworkID (NodeID) that you wrote down before in Step 6 of the Getting the Z-Wave NetworkID (NodeID) section above
Lastly, change the “Group Command Option” to “Set” and then tap on the “actionButton2” to submit the request.
You should see the “Device Info” panel fill in with the request you just made:
If you'd like Dimming functionality, then please repeat steps 5-10 and instead of inputting the number 2 in Step 7, input the number 4.
Repeat steps 5-11 for each bulb you want associated to your switch (and use the corresponding NetworkID/NodeID's from Step 7 in the Getting the Z-Wave NetworkID (NodeID) section above)
Now, return back to the main device page and then click on the three dots at the top right and select, "Driver"
Click on, "Select different driver" and then select your Inovelli Edge Driver
NOTE: If you do not have a smart bulb wired directly to your smart switch and require Smart Bulb Mode, you can skip the steps below and test your associations.Click on the three dots at the top of the screen again and select, "Settings"
Scroll down to where it says, "52. Smart Bulb Mode" and select it (NOTE: It may be different depending on the Red Series switch you have - any switches that do not have Smart Bulb Mode, please select, "Disable Relay")
Click on, "Smart Bulb Mode" and then "OK"
Go back to the device page and then test your associations. You should be able to tap up or down on the light switch and your smart bulb will turn on or off. In addition, you should be able to hold up or down to dim up or down the light bulb (assuming you've set your switch to work as a Dimmer).
If you'd like to control the colors from the switch (ie: double-tap to change the bulb to blue, triple-tap to change the bulb to red, etc), check out the instructions for Scene Control
Smart Bulb(s) NOT Wired to Smart Switch
Please select from the following drop-downs based on the number of smart bulbs you have. Please note that in this scenario, your smart switch is not wired directly to your smart bulbs and therefore we will not be using Smart Bulb Mode.
Smart Switch Wired to 1x Smart Bulb
Smart Switch Wired to 1x Smart Bulb
This part is broken into two sections: Getting the Z-Wave NetworkID and setting up Z-Wave Associations
Getting the Z-Wave NetworkID (NodeID)
In order to associate the Z-Wave devices together, we need to identify which devices will be associated together. To do this, we need to get the Z-Wave NetworkID's. SmartThings does not have an easy way to do this, so apologies for the extra steps.
First, we'll need to create a SmartThings Access Token so that we can ultimately find the smart bulb(s) information -- head to the following link and login: https://account.smartthings.com/tokens/new
Click on, "Generate new token"
Enter in a Token Name, select everything in the sections titled, "Devices" and "Locations" and then click, "Generate Token"
WRITE DOWN THE TOKEN AND SAVE IT!!! You will not be able to access this token again so you want to make sure you have it for future reference. Click on, "Copy token" move to Step 4.
Once you have the token saved in a secure place and copied to your clipboard, please go to the following URL, enter the access token and click, "Submit" (you should see your hub location and the various rooms you've created in the SmartThings app): https://lrmulli.github.io/st/index.html
Find your device and click on the, "i"
Locate where it says, "networkID" (NodeID) and copy the 2 digit code (Z-Wave NetworkID)
Z-Wave Association
Now we will associate your switch to your smart bulb. In this example, we will assume the smart bulb is the load on your smart switch (ie: the bulb socket is wired directly to your switch) -- and because of this assumption, we will also use Smart Bulb Mode (which provides constant power to your smart bulb and uses a digital signal to turn it on and off -- in this case Z-Wave Association).
Reminder: You need to have the Inovelli and, "Z-Wave Device Config Mc" Edge Drivers installed before you set up Z-Wave Associations..
Open up your SmartThings app, and click on, "Devices"
Locate your Inovelli switch and click on it
Click on the three dots at the top right and select, "Driver"
Click on, "Select different driver" and then, "Z-Wave Device Config Mc"
Back out of the device page and back into it and you should see a different interface. Click on “Settings” and then click, "Select Zwave Device Action"
Select, "Device Association Groups" as shown below followed by, "Ok":
Next select the proper group number
NOTE: Group #2 will provide On/Off functionality, whereas Group #4 will provide Dimming functionality. If you'd like both, then you will need to setup both Group 2 and Group 4.
Input the the proper NetworkID (NodeID) that you wrote down before in Step 6 of the Getting the Z-Wave NetworkID (NodeID) section above
Lastly, change the “Group Command Option” to “Set” and then tap on the “actionButton2” to submit the request.
You should see the “Device Info” panel fill in with the request you just made:
If you'd like Dimming functionality, then please repeat steps 5-10 and instead of inputting the number 2 in Step 7, input the number 4.
Now, return back to the main device page and then click on the three dots at the top right and select, "Driver"
Click on, "Select different driver" and then select your Inovelli Edge Driver
Go back to the device page and then test your associations. You should be able to tap up or down on the light switch and your smart bulb will turn on or off. In addition, you should be able to hold up or down to dim up or down the light bulb (assuming you've set your switch to work as a Dimmer).
If you'd like to control the colors from the switch (ie: double-tap to change the bulb to blue, triple-tap to change the bulb to red, etc), check out the instructions for Scene Control
Smart Switch Wired to Multiple Smart Bulbs
Smart Switch Wired to Multiple Smart Bulbs
This part is broken into two sections: Getting the Z-Wave NetworkID and setting up Z-Wave Associations
Getting the Z-Wave NetworkID (NodeID)
In order to associate the Z-Wave devices together, we need to identify which devices will be associated together. To do this, we need to get the Z-Wave NetworkID's. SmartThings does not have an easy way to do this, so apologies for the extra steps.
First, we'll need to create a SmartThings Access Token so that we can ultimately find the smart bulb(s) information -- head to the following link and login: https://account.smartthings.com/tokens/new
Click on, "Generate new token"
Enter in a Token Name, select everything in the sections titled, "Devices" and "Locations" and then click, "Generate Token"
WRITE DOWN THE TOKEN AND SAVE IT!!! You will not be able to access this token again so you want to make sure you have it for future reference. Click on, "Copy token" move to Step 4.
Once you have the token saved in a secure place and copied to your clipboard, please go to the following URL, enter the access token and click, "Submit" (you should see your hub location and the various rooms you've created in the SmartThings app): https://lrmulli.github.io/st/index.html
Find your device and click on the, "i"
Locate where it says, "networkID" (NodeID) and copy the 2 digit code (Z-Wave NetworkID)
Repeat steps 5 & 6 for each bulb you'd like to associate your switch to
Z-Wave Association
Now we will associate your switch to your smart bulb. In this example, we will assume the smart bulb is the load on your smart switch (ie: the bulb socket is wired directly to your switch) -- and because of this assumption, we will also use Smart Bulb Mode (which provides constant power to your smart bulb and uses a digital signal to turn it on and off -- in this case Z-Wave Association).
Reminder: You need to have the Inovelli and, "Z-Wave Device Config Mc" Edge Drivers installed before you set up Z-Wave Associations..
Open up your SmartThings app, and click on, "Devices"
Locate your Inovelli switch and click on it
Click on the three dots at the top right and select, "Driver"
Click on, "Select different driver" and then, "Z-Wave Device Config Mc"
Back out of the device page and back into it and you should see a different interface. Click on “Settings” and then click, "Select Zwave Device Action"
Select, "Device Association Groups" as shown below followed by, "Ok":
Next select the proper group number
NOTE: Group #2 will provide On/Off functionality, whereas Group #4 will provide Dimming functionality. If you'd like both, then you will need to setup both Group 2 and Group 4.
Input the the proper NetworkID (NodeID) that you wrote down before in Step 6 of the Getting the Z-Wave NetworkID (NodeID) section above
Lastly, change the “Group Command Option” to “Set” and then tap on the “actionButton2” to submit the request.
You should see the “Device Info” panel fill in with the request you just made:
If you'd like Dimming functionality, then please repeat steps 5-10 and instead of inputting the number 2 in Step 7, input the number 4.
Repeat steps 5-11 for each bulb you want associated to your switch (and use the corresponding NetworkID/NodeID's from Step 7 in the Getting the Z-Wave NetworkID (NodeID) section above)
Now, return back to the main device page and then click on the three dots at the top right and select, "Driver"
Click on, "Select different driver" and then select your Inovelli Edge Driver
Go back to the device page and then test your associations. You should be able to tap up or down on the light switch and your smart bulb will turn on or off. In addition, you should be able to hold up or down to dim up or down the light bulb (assuming you've set your switch to work as a Dimmer).
If you'd like to control the colors from the switch (ie: double-tap to change the bulb to blue, triple-tap to change the bulb to red, etc), check out the instructions for Scene Control
Switch to Switch
Please select from the following drop-downs based on the number of smart bulbs you have.
2x Smart Switches (ie: Switch to Switch)
2x Smart Switches (ie: Switch to Switch)
This part is broken into two sections: Getting the Z-Wave NetworkID and setting up Z-Wave Associations
Getting the Z-Wave NetworkID (NodeID)
In order to associate the Z-Wave devices together, we need to identify which devices will be associated together. To do this, we need to get the Z-Wave NetworkID's. SmartThings does not have an easy way to do this, so apologies for the extra steps.
First, we'll need to create a SmartThings Access Token so that we can ultimately find the smart bulb(s) information -- head to the following link and login: https://account.smartthings.com/tokens/new
Click on, "Generate new token"
Enter in a Token Name, select everything in the sections titled, "Devices" and "Locations" and then click, "Generate Token"
WRITE DOWN THE TOKEN AND SAVE IT!!! You will not be able to access this token again so you want to make sure you have it for future reference. Click on, "Copy token" move to Step 4.
Once you have the token saved in a secure place and copied to your clipboard, please go to the following URL, enter the access token and click, "Submit" (you should see your hub location and the various rooms you've created in the SmartThings app): https://lrmulli.github.io/st/index.html
Find your device and click on the, "i"
Locate where it says, "networkID" (NodeID) and copy the 2 digit code (Z-Wave NetworkID)
Z-Wave Association
Now we will associate your switch to your smart bulb. In this example, we will assume the smart bulb is the load on your smart switch (ie: the bulb socket is wired directly to your switch) -- and because of this assumption, we will also use Smart Bulb Mode (which provides constant power to your smart bulb and uses a digital signal to turn it on and off -- in this case Z-Wave Association).
Reminder: You need to have the Inovelli and, "Z-Wave Device Config Mc" Edge Drivers installed before you set up Z-Wave Associations..
Open up your SmartThings app, and click on, "Devices"
Locate your Inovelli switch and click on it
Click on the three dots at the top right and select, "Driver"
Click on, "Select different driver" and then, "Z-Wave Device Config Mc"
Back out of the device page and back into it and you should see a different interface. Click on “Settings” and then click, "Select Zwave Device Action"
Select, "Device Association Groups" as shown below followed by, "Ok":
Next select the proper group number
NOTE: Group #2 will provide On/Off functionality, whereas Group #4 will provide Dimming functionality. If you'd like both, then you will need to setup both Group 2 and Group 4.
Input the the proper NetworkID (NodeID) that you wrote down before in Step 6 of the Getting the Z-Wave NetworkID (NodeID) section above
Lastly, change the “Group Command Option” to “Set” and then tap on the “actionButton2” to submit the request.
You should see the “Device Info” panel fill in with the request you just made:
If you'd like Dimming functionality, then please repeat steps 5-10 and instead of inputting the number 2 in Step 7, input the number 4.
Now, return back to the main device page and then click on the three dots at the top right and select, "Driver"
Click on, "Select different driver" and then select your Inovelli Edge Driver
Go back to the device page and then test your associations. You should be able to tap up or down on the light switch and your other light switch will turn on or off. In addition, you should be able to hold up or down to dim up or down the other switch (assuming you've set your switch to work as a Dimmer).
If you'd like to control the colors from the switch (ie: double-tap to change the bulb to blue, triple-tap to change the bulb to red, etc), check out the instructions for Scene Control
3+ Smart Switches (ie: Switch to Switch to Switch)
3+ Smart Switches (ie: Switch to Switch to Switch)
This part is broken into two sections: Getting the Z-Wave NetworkID and setting up Z-Wave Associations
Getting the Z-Wave NetworkID (NodeID)
In order to associate the Z-Wave devices together, we need to identify which devices will be associated together. To do this, we need to get the Z-Wave NetworkID's. SmartThings does not have an easy way to do this, so apologies for the extra steps.
First, we'll need to create a SmartThings Access Token so that we can ultimately find the smart bulb(s) information -- head to the following link and login: https://account.smartthings.com/tokens/new
Click on, "Generate new token"
Enter in a Token Name, select everything in the sections titled, "Devices" and "Locations" and then click, "Generate Token"
WRITE DOWN THE TOKEN AND SAVE IT!!! You will not be able to access this token again so you want to make sure you have it for future reference. Click on, "Copy token" move to Step 4.
Once you have the token saved in a secure place and copied to your clipboard, please go to the following URL, enter the access token and click, "Submit" (you should see your hub location and the various rooms you've created in the SmartThings app): https://lrmulli.github.io/st/index.html
Find your device and click on the, "i"
Locate where it says, "networkID" (NodeID) and copy the 2 digit code (Z-Wave NetworkID)
Repeat steps 5 & 6 for each switch you'd like to associate your switch to
Z-Wave Association
Now we will associate your switch to your smart bulb. In this example, we will assume the smart bulb is the load on your smart switch (ie: the bulb socket is wired directly to your switch) -- and because of this assumption, we will also use Smart Bulb Mode (which provides constant power to your smart bulb and uses a digital signal to turn it on and off -- in this case Z-Wave Association).
Reminder: You need to have the Inovelli and, "Z-Wave Device Config Mc" Edge Drivers installed before you set up Z-Wave Associations..
Open up your SmartThings app, and click on, "Devices"
Locate your Inovelli switch and click on it
Click on the three dots at the top right and select, "Driver"
Click on, "Select different driver" and then, "Z-Wave Device Config Mc"
Back out of the device page and back into it and you should see a different interface. Click on “Settings” and then click, "Select Zwave Device Action"
Select, "Device Association Groups" as shown below followed by, "Ok":
Next select the proper group number
NOTE: Group #2 will provide On/Off functionality, whereas Group #4 will provide Dimming functionality. If you'd like both, then you will need to setup both Group 2 and Group 4.
Input the the proper NetworkID (NodeID) that you wrote down before in Step 6 of the Getting the Z-Wave NetworkID (NodeID) section above
Lastly, change the “Group Command Option” to “Set” and then tap on the “actionButton2” to submit the request.
You should see the “Device Info” panel fill in with the request you just made:
If you'd like Dimming functionality, then please repeat steps 5-10 and instead of inputting the number 2 in Step 7, input the number 4.
Repeat steps 5-11 for each switch you want associated to your switch (and use the corresponding NetworkID/NodeID's from Step 7 in the Getting the Z-Wave NetworkID (NodeID) section above)
Now, return back to the main device page and then click on the three dots at the top right and select, "Driver"
Click on, "Select different driver" and then select your Inovelli Edge Driver
Go back to the device page and then test your associations. You should be able to tap up or down on the light switch and your switches will turn on or off. In addition, you should be able to hold up or down to dim up or down the switch (assuming you've set your switch to work as a Dimmer).
If you'd like to control the colors from the switch (ie: double-tap to change the bulb to blue, triple-tap to change the bulb to red, etc), check out the instructions for Scene Control